SSO - Single Sign-on
Version added: v0.20.0
Intro
Tactical RMM's Single Sign-On (SSO) feature supports all OIDC-compatible authentication providers out of the box, allowing flexible integration with providers like Google, Microsoft, or any other that supports the OpenID Connect (OIDC) standard.
This approach enables you to configure any compatible provider by simply entering its URL, giving you the freedom to choose the identity provider that best suits your needs without specific provider dependencies.
Video Walkthru
License
The SSO feature is released under the Tactical RMM Enterprise License and requires a Tier 1 or higher sponsorship.
Enable SSO
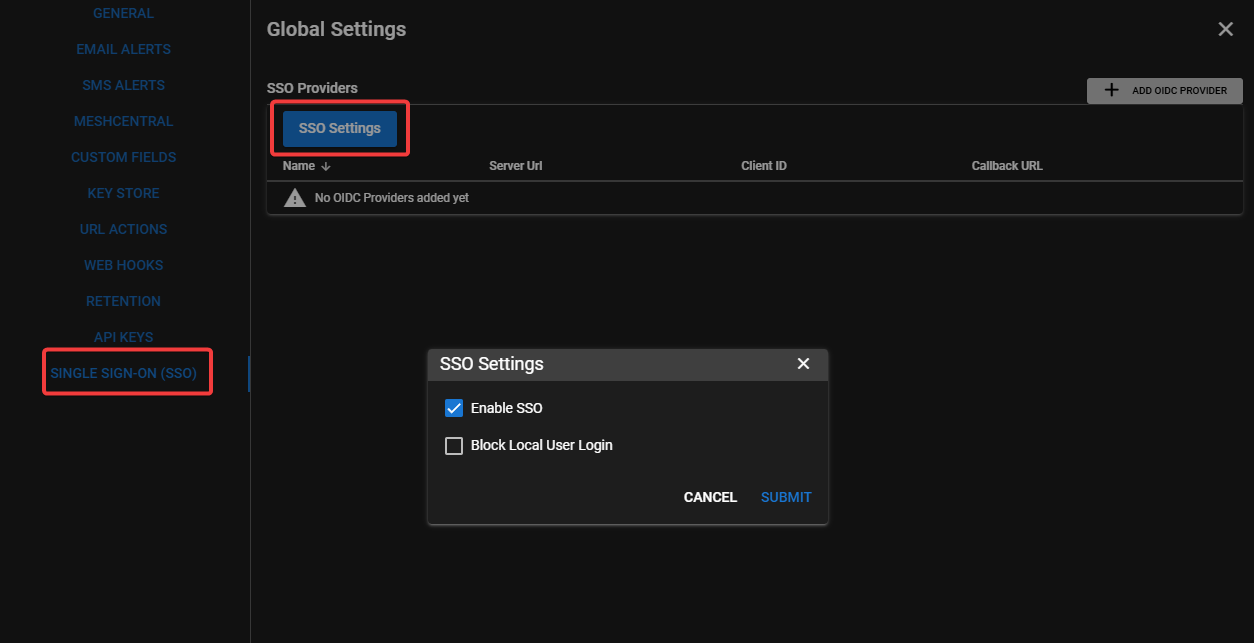
SSO can be enabled via Global Settings > SSO. There is also an option to block regular user logins, allowing only SSO sign-ons (with the exception of local superusers).
Add OIDC Provider
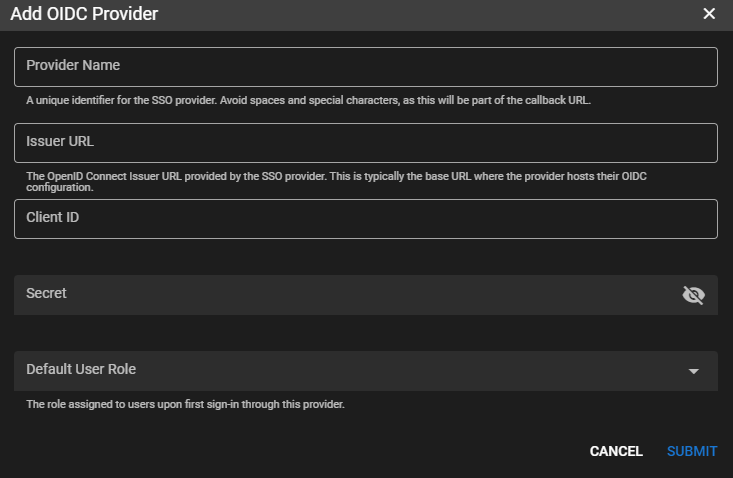
Provider Name: A unique identifier for the SSO provider. Name this whatever you want, but avoid spaces and special characters, as this will be part of the callback URL. This name will appear on the Tactical RMM Login page.
Issuer URL: The OpenID Connect Issuer URL provided by the SSO provider. This is typically the base URL where the provider hosts their OIDC configuration.
Issuer URL examples
GitLab: https://gitlab.com
Apple: https://appleid.apple.com
Twitch: https://id.twitch.tv/oauth2
Facebook: https://www.facebook.com
Mattermost: https://developers.mattermost.com/integrate/admin-guide/admin-oauth2/#oauth-endpoints
Client ID: A unique identifier provided by your OIDC provider that represents your application, allowing the provider to recognize it during the authentication process.
Secret: A secure key provided by your OIDC provider, used in combination with the Client ID to authenticate your application and ensure secure communication between your app and the provider.
Default User Role: The Tactical RMM Role that should be assigned to the SSO user on first sign in.
Examples
Google Workspace
Info
Using Google as an OAuth provider is only supported if you are using Google Workspace.
1. Create a Project
-
Open the google cloud console
-
Create a project or use an existing one
-
Go to the Auth Overview page and click on the 'Getting Started' button to setup the project. Select Internal for the user type.
2. Setup Branding
-
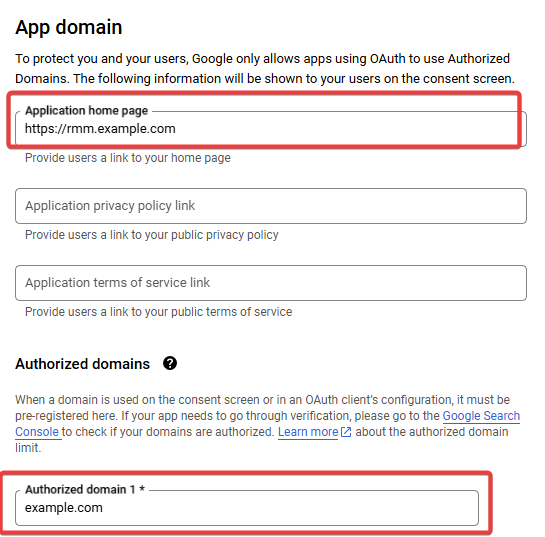
Setup Branding (OAuth consent screen)
- Make sure that "Authorized domains" includes the root domain of your instance.
3. Create a Client
-
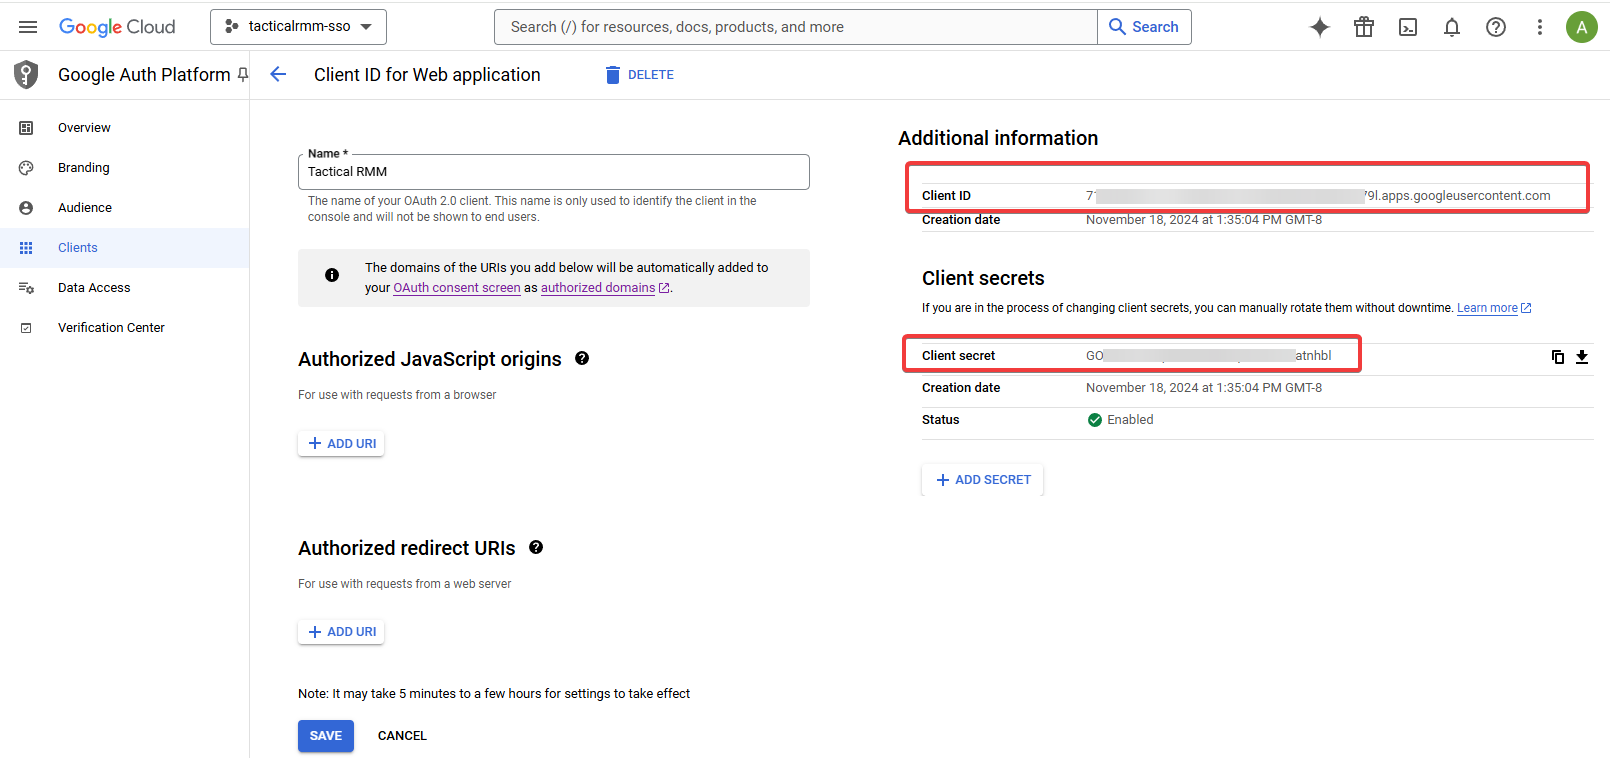
Create a client
- Application type: Web application
- Name: Tactical RMM
- Do not add javascript or redirect urls yet, we'll come back to this.
-
Click Create.
-
Click on the newly created client to open it and then copy the Client ID and Secret.
4. Add Provider in TRMM
Provider Name: Google
Issuer URL: https://accounts.google.com
Client ID and Secret: what you just copied.
Default User Role: choose a role.
Click Submit
5. Add Callback URLs
-
Right click on the provider in TRMM and copy both the Callback URL as well as the Allowed Javascript Origin
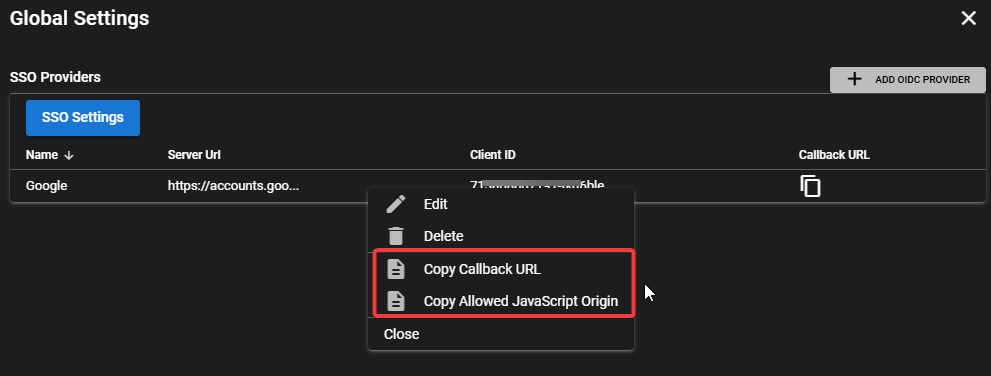
-
Go back to the Client screen in the Google console and paste in the 2 copied urls. Note: Callback URL = Authorized redirect URI
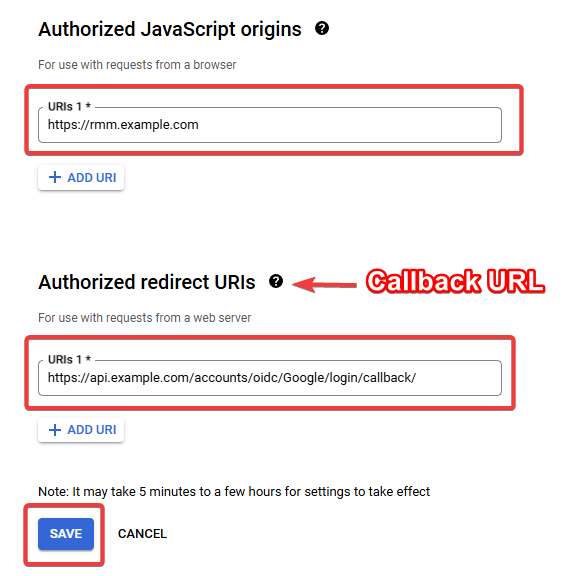
Microsoft Entra ID / Azure
1. Register an application
-
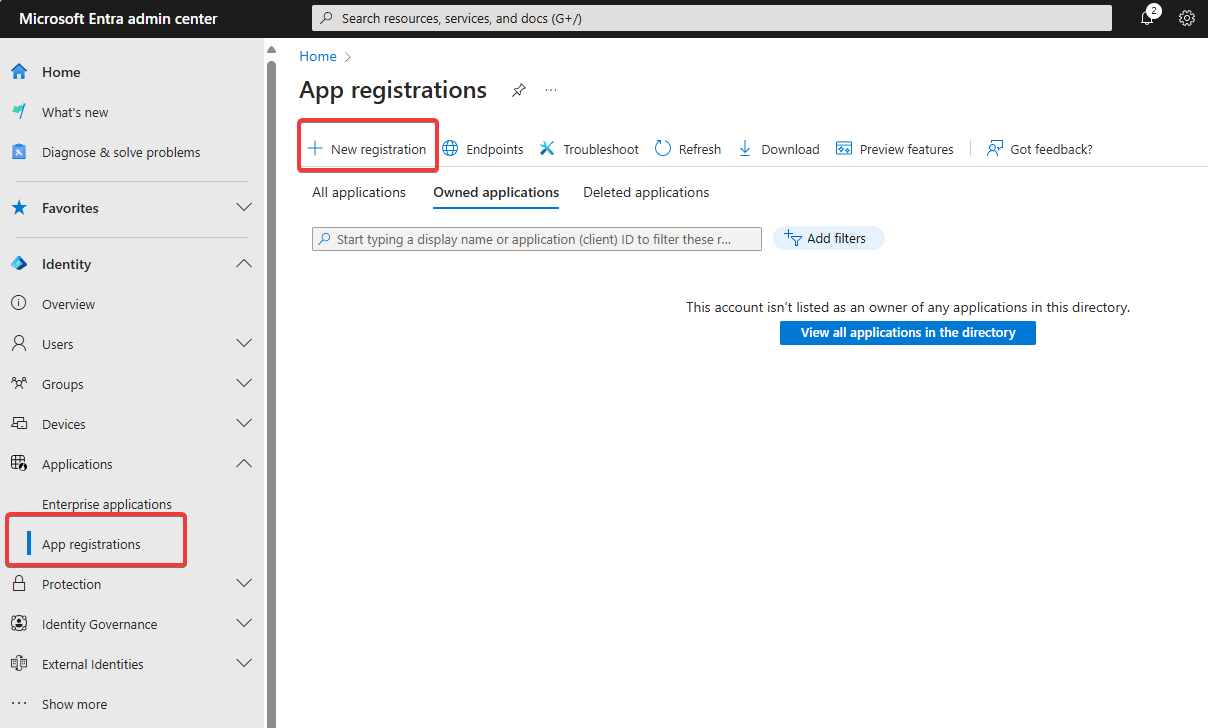
Go to https://entra.microsoft.com (Previously Azure Active Directory), in the left sidebar select Applications > App registrations
-
Click "+ New registration"
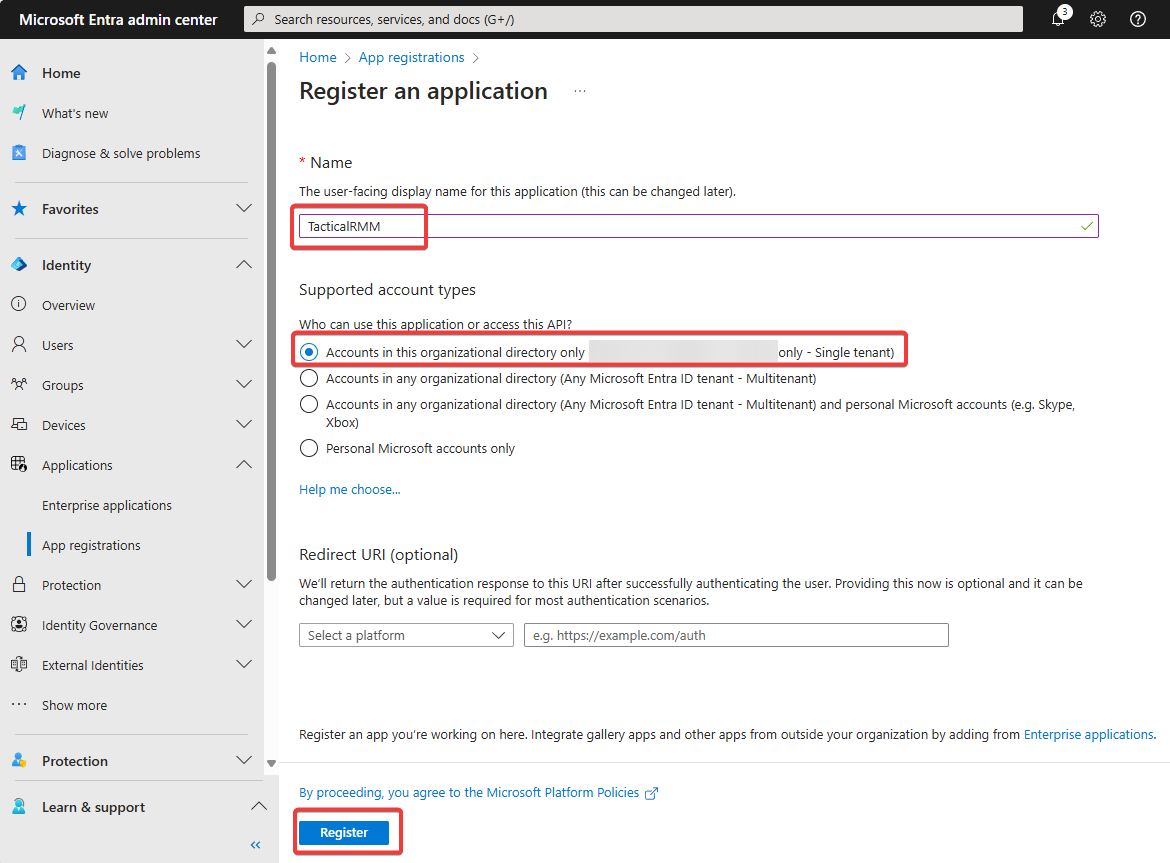
- Name:
TacticalRMM - Choose "Accounts in this organizational directory only"
- Name:
-
Click Register
2. Tenant ID
-
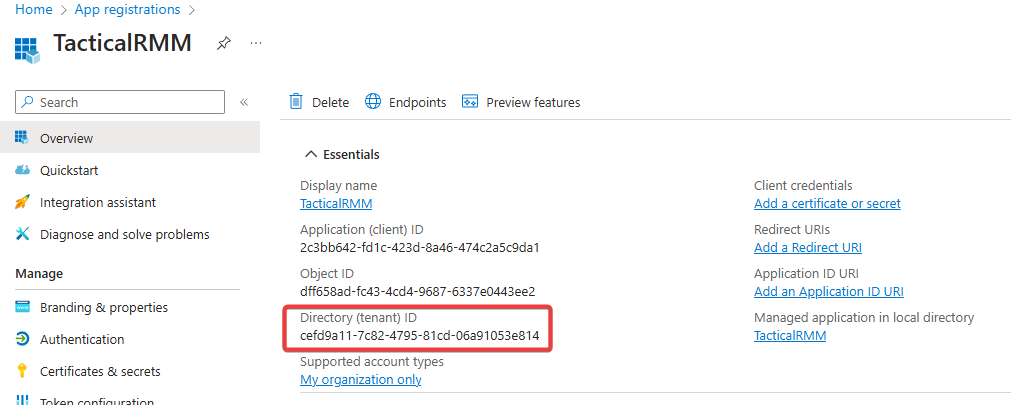
Copy the "Directory (tenant) ID" and save it somewhere.
3. API Permissions
-
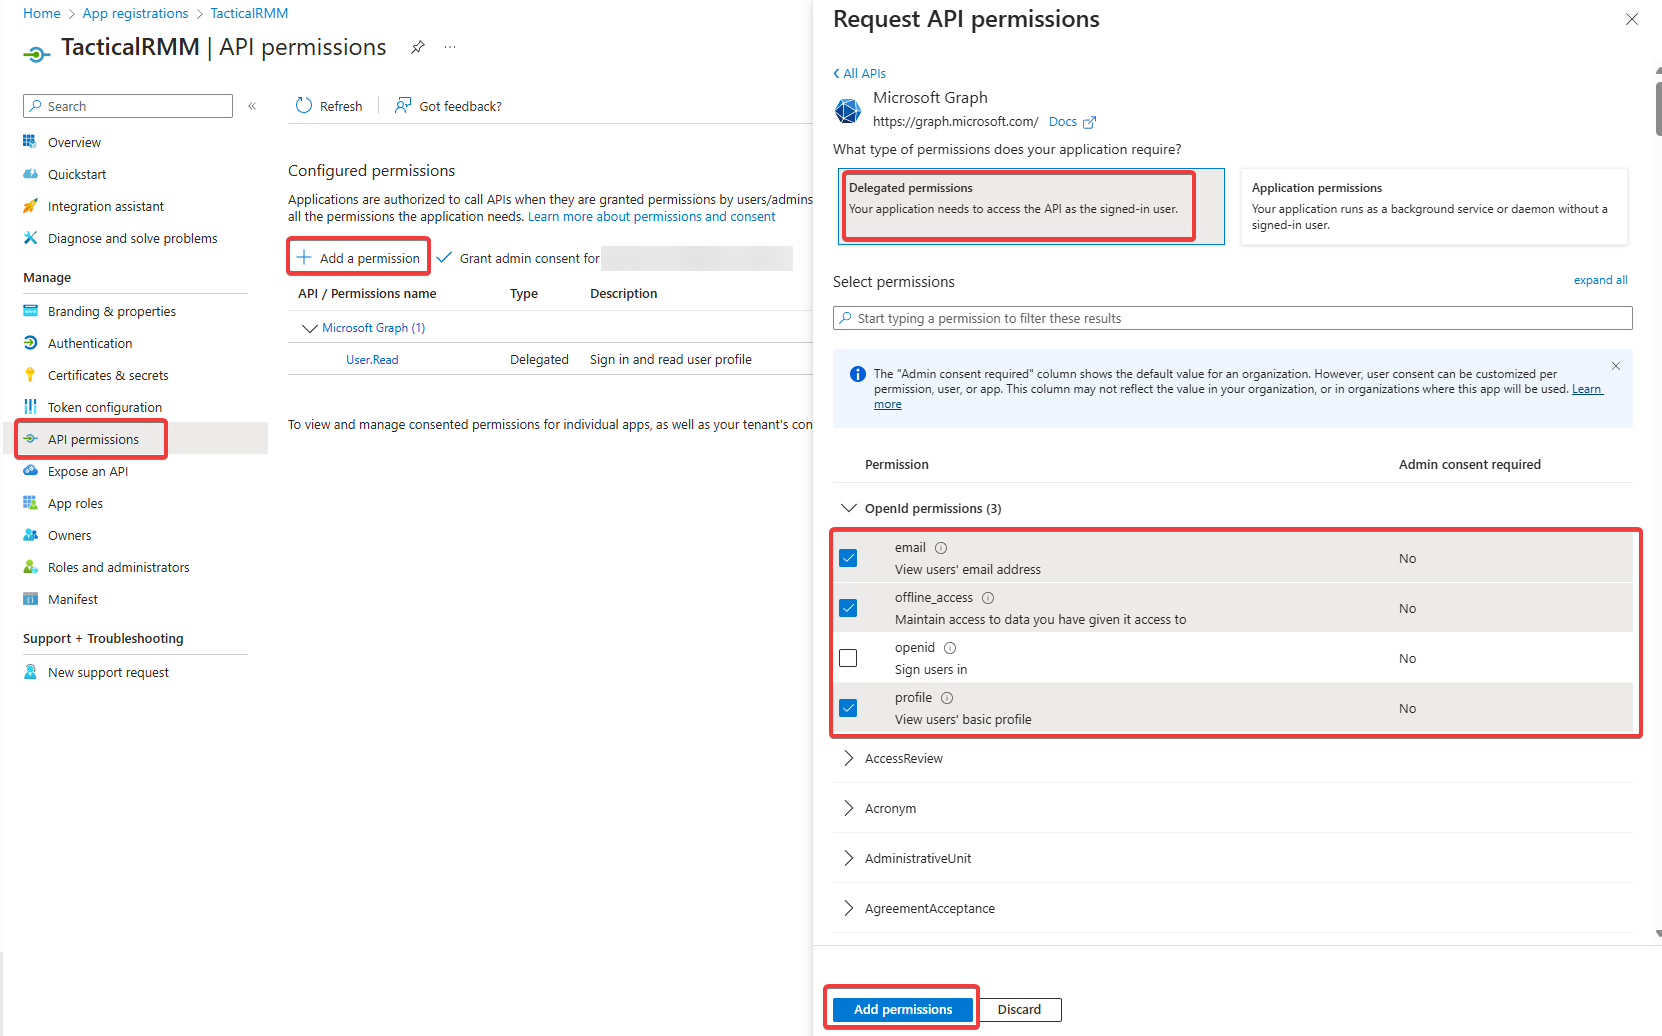
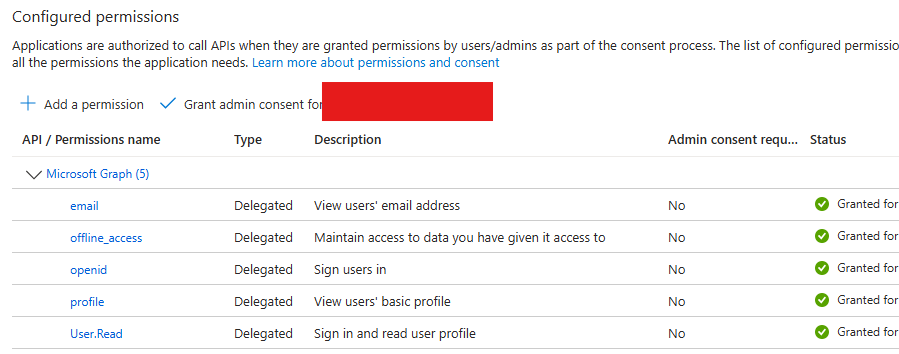
Select "API permissions" from the left sidebar, click "Add a permission" > "Microsoft Graph" > "Delegated permissions" and select "email", "offline_access" and "profile"
4. Certificates and secrets
-
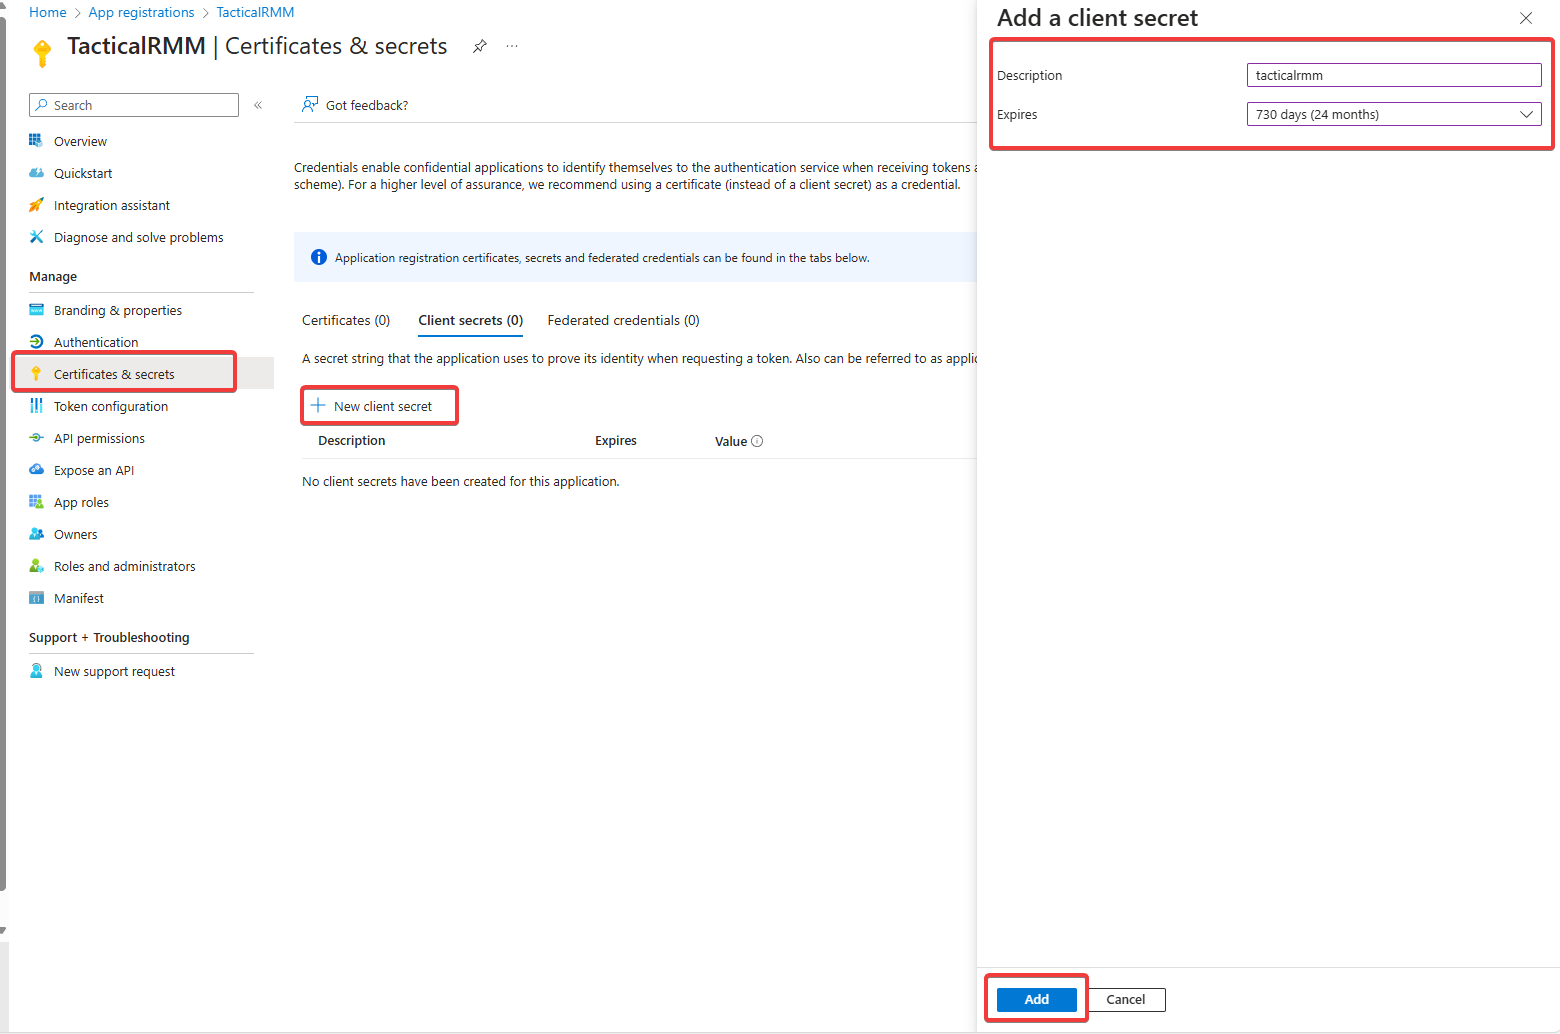
Select "Certificates and secrets" in the left sidebar, Select "+ New client secret", name it something like "tacticalrmm", choose and expiration date and make a note of the resulting secret value.

5. Add Provider in TRMM
-
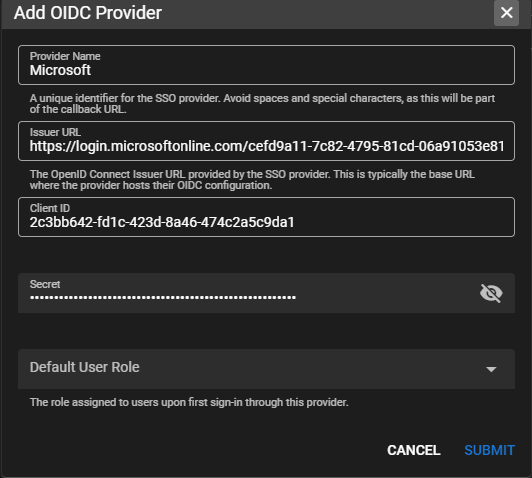
Provider Name:
Microsoft -
Issuer URL: https://login.microsoftonline.com/replace with tenant ID/v2.0
- Replace the tenant ID with the ID from step 2 above.
- For example:
https://login.microsoftonline.com/cefd9a11-7c82-4795-81cd-06a91053e814/v2.0
-
Client ID: copy this from the Overview tab in the Entra portal:

-
Secret: paste in the secret you copied from Step 4.
-
Default User Role: choose a role.
-
Click Submit
6. Add Redirect URI
-
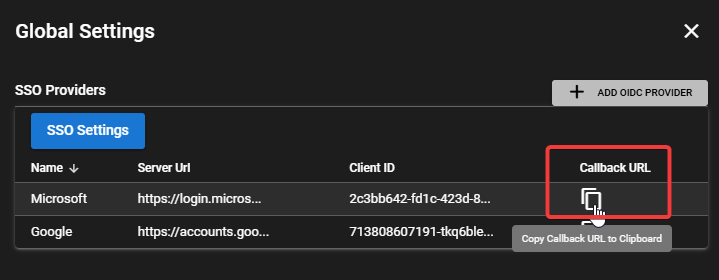
Copy the Callback URL from the TRMM Providers List
-
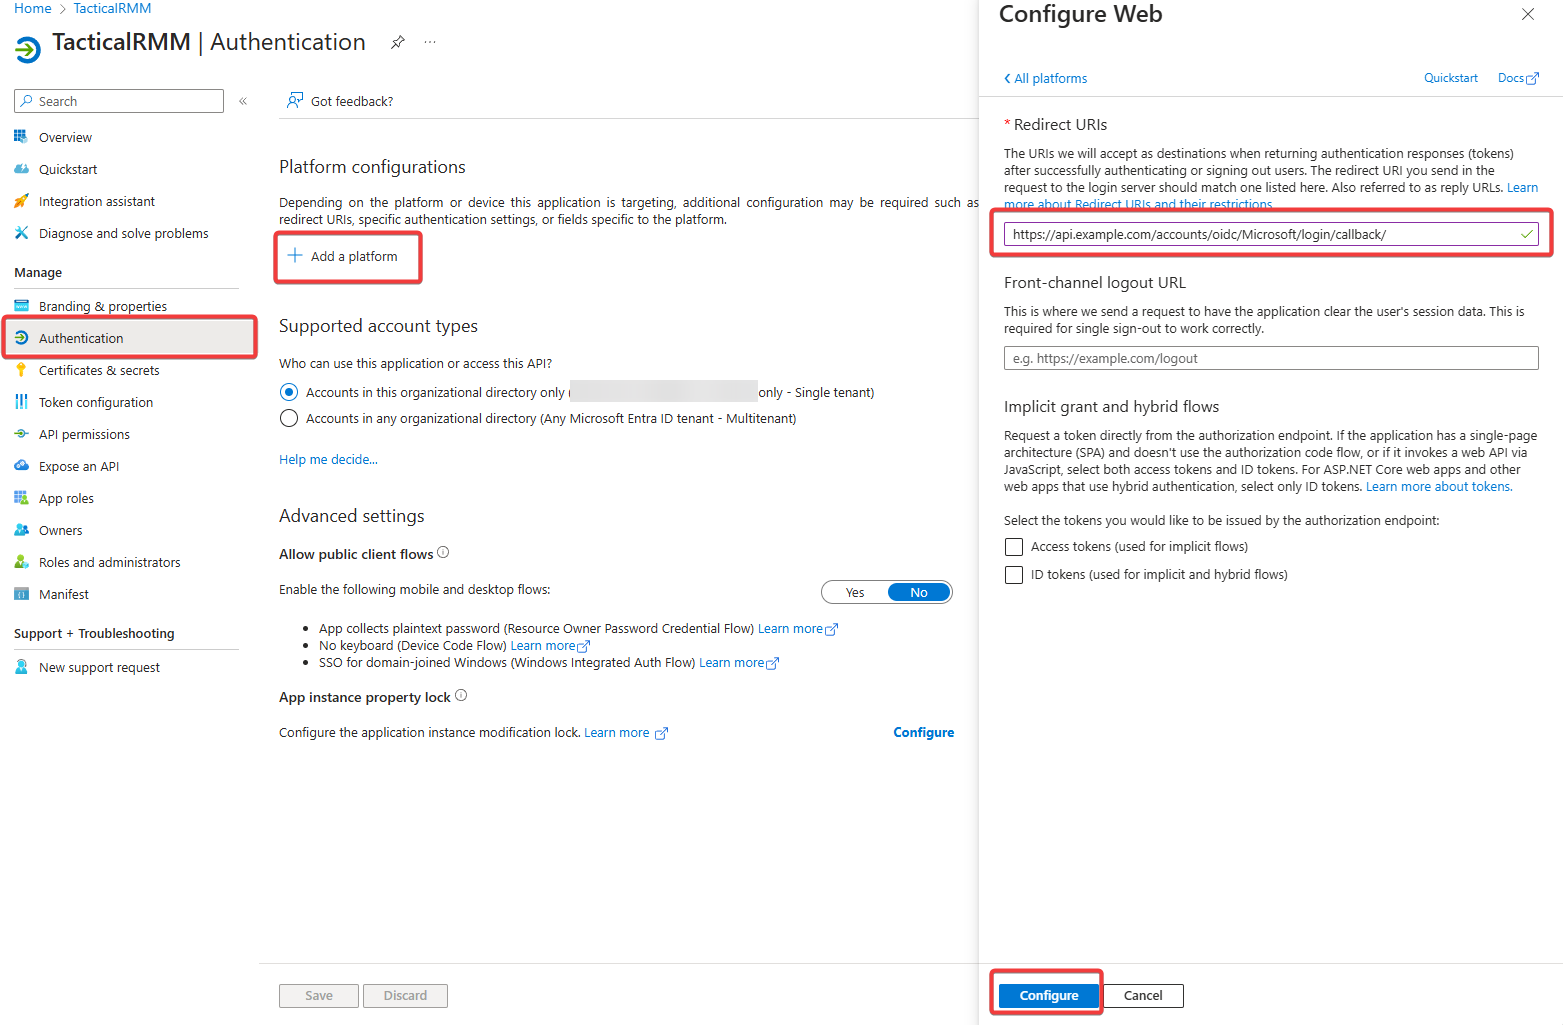
In the Entra portal, go to the Authentication tab in the left sidebar, click "+ Add a platform", choose "Web" and enter the Calllback URL you just copied.
-
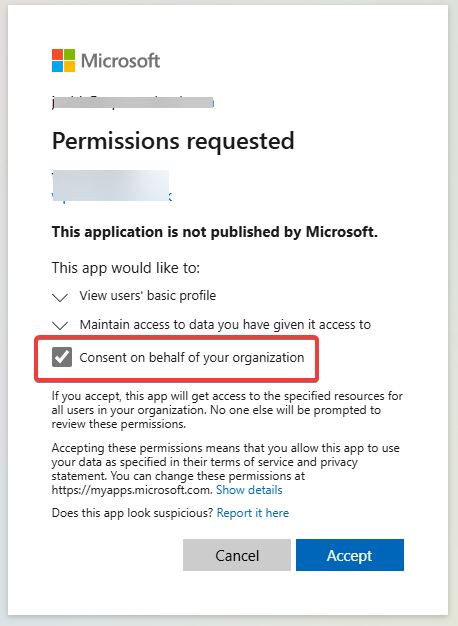
Note: When logging in for the first time, you MUST check "Consent on behalf of your organization".
Authentik
Assumes you've already installed Authentik.
Can use DNS name (recommended) or IP for Authentik server.
In TRMM
- Click
Add OIDC Providerbutton - Give Provider Name:
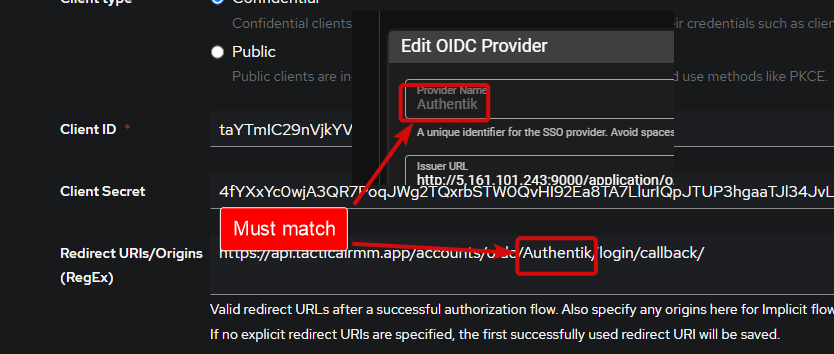
Authentik
In Authentik
- Create Provider > OAuth2/OpenID Provider
- Name:
TacticalRMM - Authentication Flow:
default-authentication-flow (Welcome to authentik!) - Authorization flow:
default-provider-authorization-explicit-consent (Authorize Application) - Client Type: Confidential
- Client ID: Copy from Authentik and paste into TRMM Client ID
- Client Secret: Copy from Authentik and paste into TRMM Secret
- Redirect URIs/Origins (Regex): Adjust this to your TRMM servers API URL and paste
https://<TRMM API URL ie api.example.com>/accounts/oidc/Authentik/login/callback/(also found in the right-click menu of the TRMMs SSO Provider) - Signing Key:
authentik Self-signed Certificate
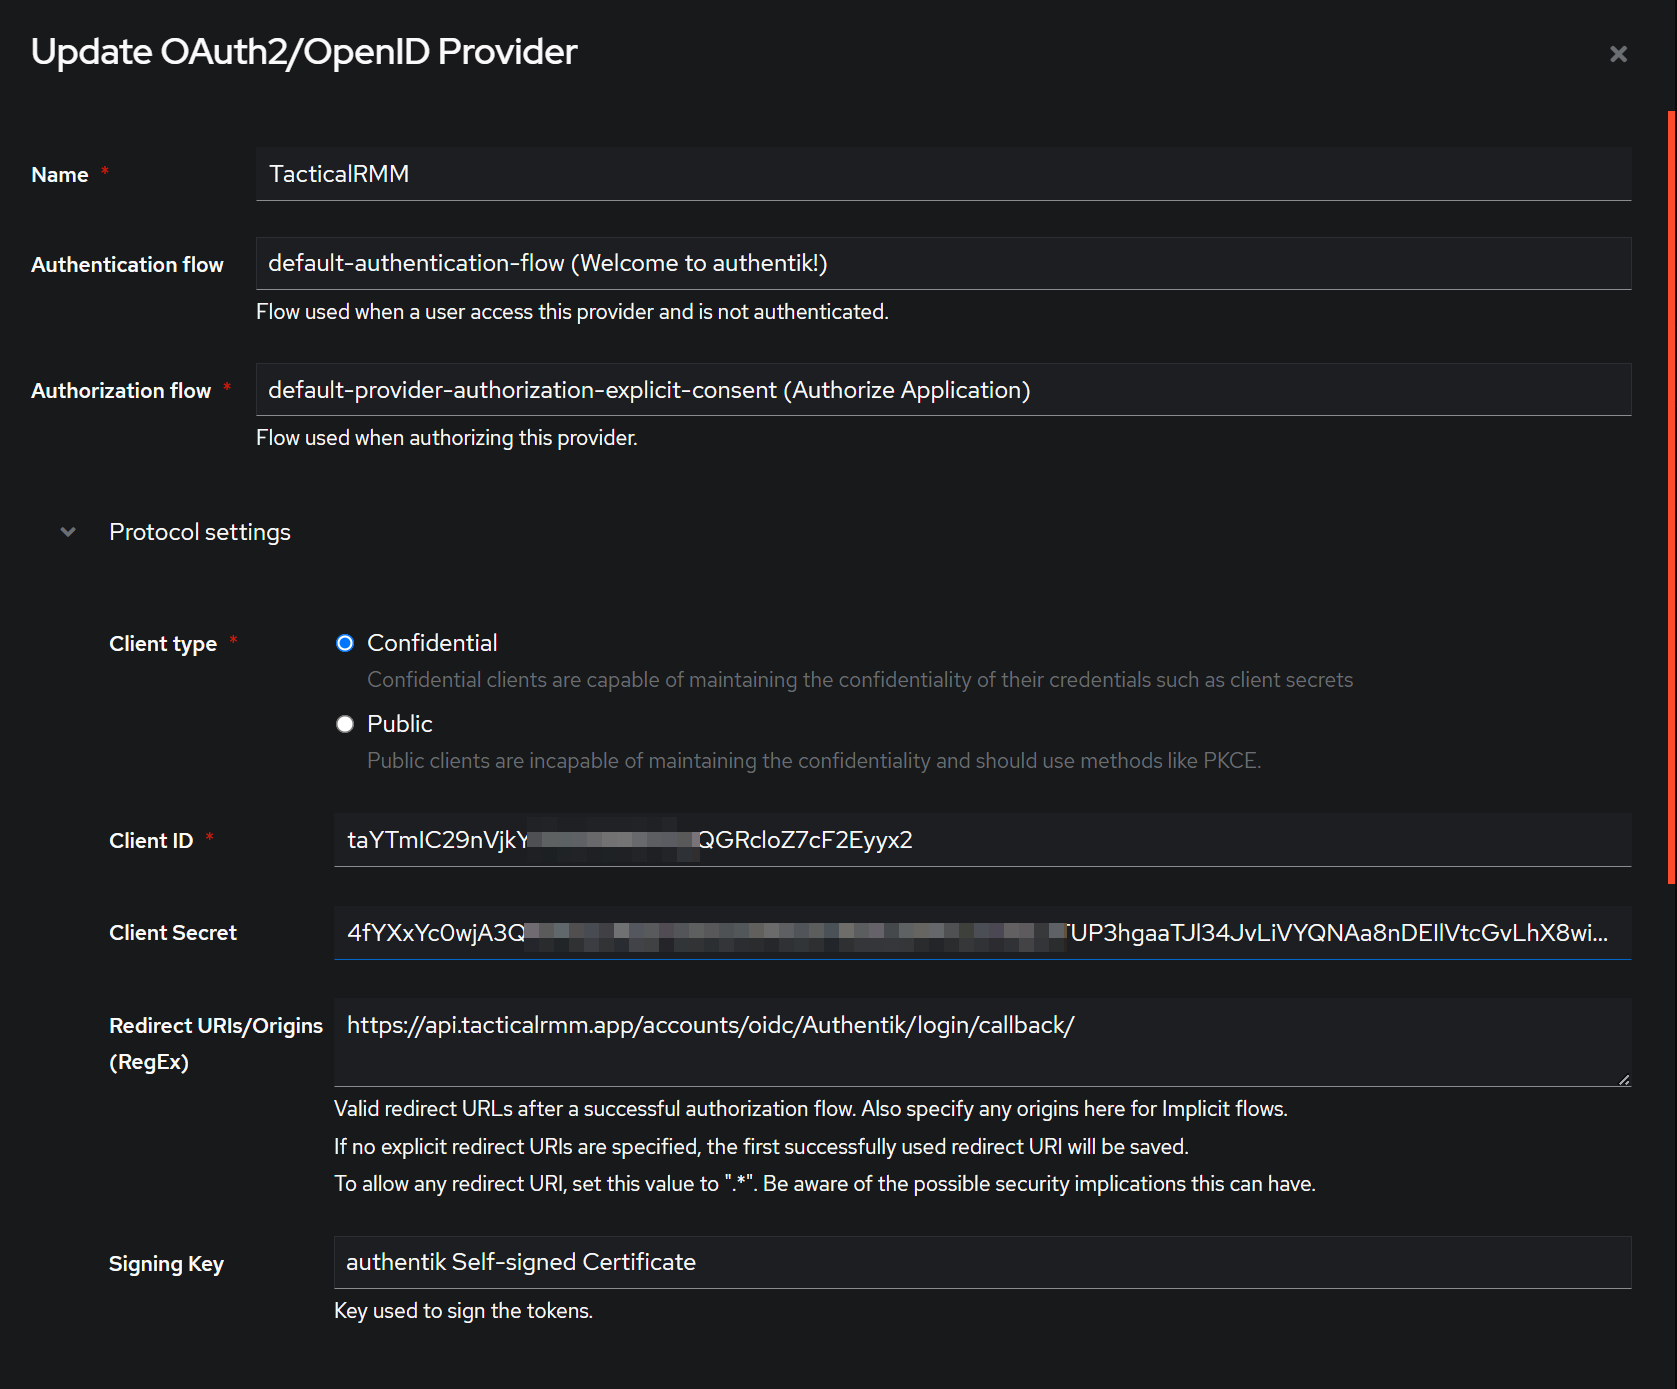
Create Authentik Application
- Name:
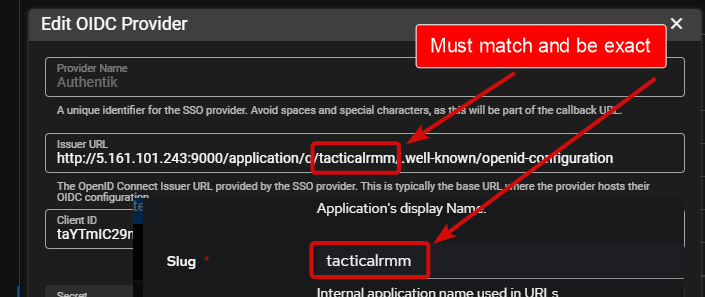
TacticalRMM - Slug:
tacticalrmm - Provider: Choose
TacticalRMMand Create
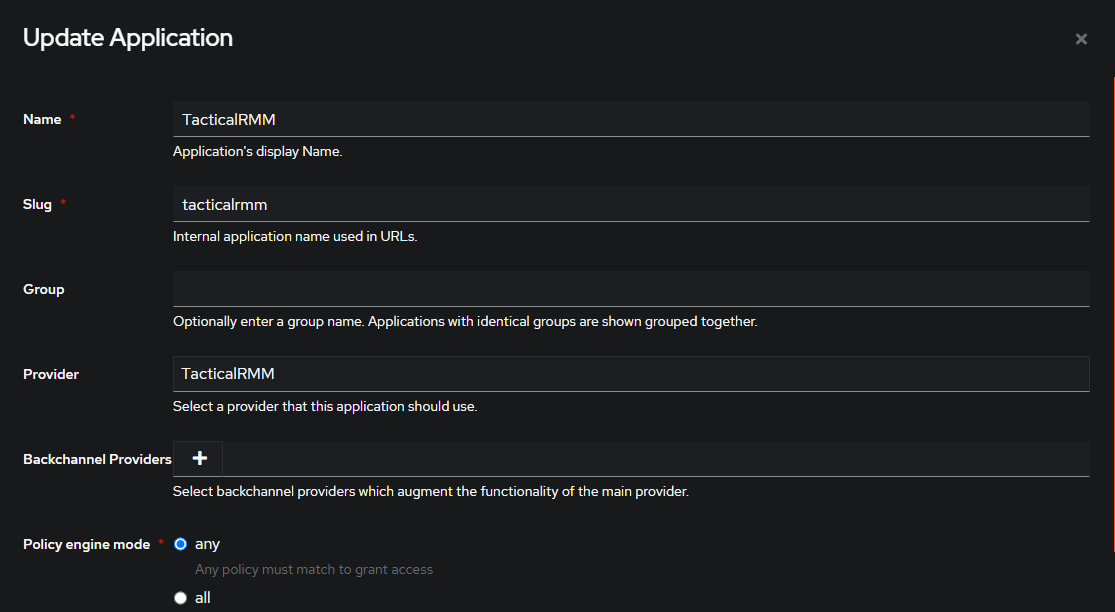
In TRMM
- Issuer URL:
https://<your authentik IP or domain>/application/o/tacticalrmm/.well-known/openid-configuration - Select your desired Default User Role from TRMM Permissions
- Submit and test!
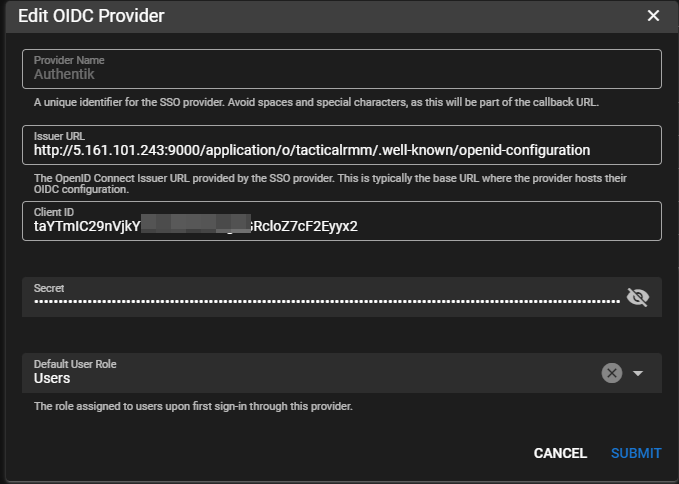
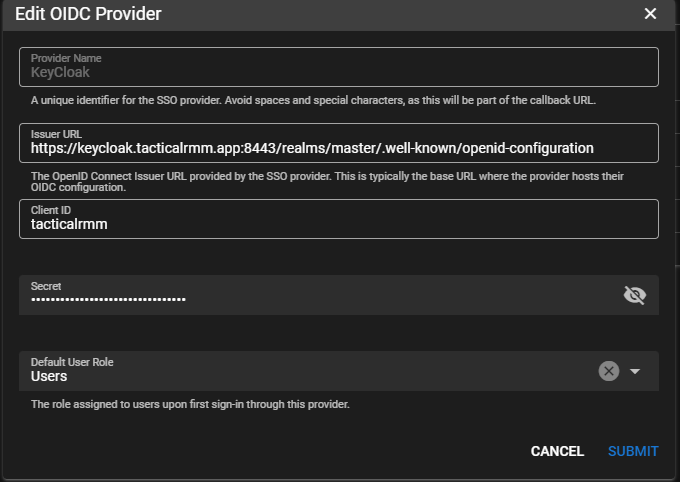
Keycloak
In TRMM
- Click
Add OIDC Providerbutton - Give Provider Name:
KeyCloak
In KeyCloak
- Click Clients. Create client
- Client type:
OpenID Connect - Client ID:
tacticalrmm. Also paste into TRMM "Client ID" field - Name:
TacticalRMM - Hit Next
- Enable
Client Authentication 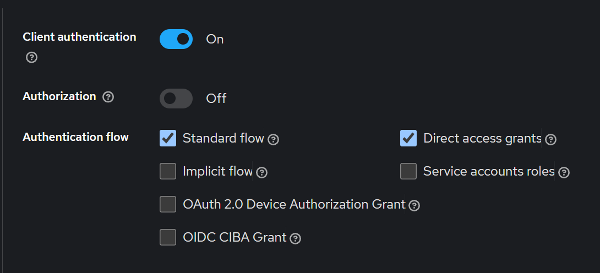
- Hit Next
- Root URL:
https://<TRMM rmm url ie rmm.tacticalrmm.app> - Enter Valid Redirect URL:
https://<TRMM API URL ie api.example.com>/accounts/oidc/KeyCloak/login/callback/ - Web Origins:
https://<TRMM rmm url ie rmm.tacticalrmm.app> - Hit Save
- Go to Credentials tab and copy Client Secret.
In TRMM
- Paste into TRMMs Secret field
- Issuer URL:
https://<KeyCloak server dns/ip>:8443/realms/master/.well-known/openid-configuration - Set Default User Role and Submit
In KeyCloak
- Create Role
Users
- Create new user or use existing
- Go to Users and assign Role via Role Mapping
Tactical RMM
- Add SSO Provider
- Name:
KeyCloak - Client ID from step 1 in Create Client
- Secret from Step 8
- Assign default roles
- Save
Authelia
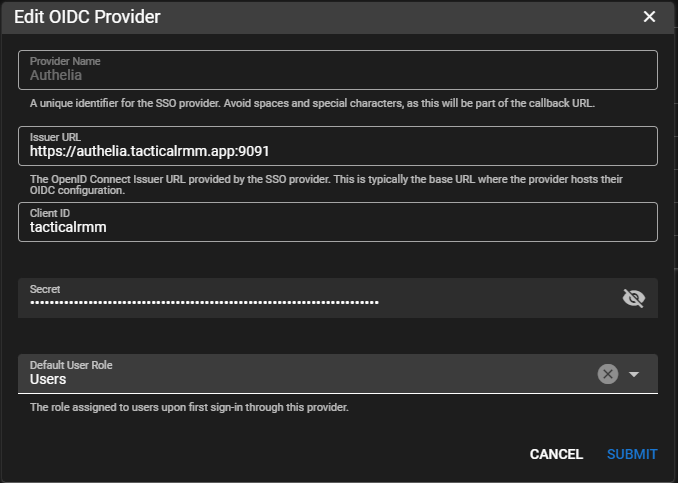
Generate Client secret with https://www.authelia.com/integration/openid-connect/frequently-asked-questions/#client-secret
Add config to bottom of Authelia Config (presumably all setup already)
identity_providers:
  oidc:
    ## The other portions of the mandatory OpenID Connect 1.0 configuration go here.
    ## See: https://www.authelia.com/c/oidc
    clients:
    - client_id: 'tacticalrmm'
        client_name: 'TacticalRMM'
        client_secret: '$pbkdf2-sha512$310000$RJhFsh2Vz.18TX81znDaeA$wDEv6CQSE8zK8ApzfQyzd69fUjuIwSEduircgT/cQnlOm4qrgfxq9JMzmtGQrGV2ZgI812tomyqnFBGQrLXyWQ'
        public: false
        authorization_policy: 'two_factor'
        require_pkce: true
        pkce_challenge_method: 'S256'
        redirect_uris:
        - 'https://api.tacticalrmm.app/accounts/oidc/Authelia/login/callback/'
        scopes:
        - 'openid'
        - 'profile'
        - 'groups'
        - 'email'
        userinfo_signed_response_alg: 'none'
        token_endpoint_auth_method: 'client_secret_basic'
        pre_configured_consent_duration: '1 year'
Warnings
Names AND vaLUES in TRMM and your SSO application are interdependant, must match and are cAse sEnsitive. Following these instructions and copying/pasting names exactly will result in successful connections.
Security
When using SSO, the security of your application depends on the configuration of your chosen authentication provider. While local TRMM accounts enforce mandatory 2FA for enhanced security, SSO providers may not require 2FA by default. To maintain strong security, ensure that your SSO provider is configured with 2FA or equivalent measures to protect user accounts.
For those who have no interest in using this feature and want it completely disabled, SSO can be disabled at the filesystem level, which will override the setting in Global Settings in the web interface.
Disable SSO at the filesystem level
Append the following variable to /rmm/api/tacticalrmm/tacticalrmm/local_settings.py
TRMM_DISABLE_SSO = True
Restart the following services: sudo systemctl restart rmm daphne
Add TRMM_DISABLE_SSO=True to your .env file and run docker compose down && docker compose up -d
How do I activate SSO as a new sponsor?
Ignore the following if you're an existing sponsor upgrading from a version below 0.20.0, as SSO will automatically be activated for you during the upgrade process.
-
Make sure your server has an appropriate code signing token saved ( Settings > Code Signing).
-
Run the update script with the
--forceflag (see instructions below for standard vs docker installs): -
Hard reload the web page. Make sure you use your browser's reload button to hard reload the page.
cd ~
wget -N https://raw.githubusercontent.com/amidaware/tacticalrmm/master/update.sh
chmod +x update.sh
./update.sh --force
docker compose down
docker compose up -d
For any issues with activating SSO, open a ticket.
Troubleshooting
Note
SSO errors are typically logged on your provider's side. Check your authentication provider's error logs for more detailed messages.
There was an error logging into your provider
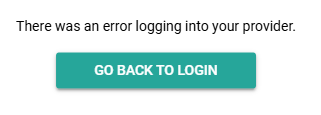
If you encounter the following error message:
"There was an error logging into your provider."
this typically indicates one of the following issues:
-
Email Address Conflict
This error often occurs if there is an existing TRMM local account with the same email address as the SSO account you are trying to log in with. To resolve this:
-
Option 1: Edit the TRMM local user and update its email address to a different value, such as
user@fakedomain.com.Note: The email address field for local users is not currently used for any functionality, so it can be set to any value.
-
Option 2: Delete the conflicting TRMM local user.
-
-
Microsoft Entra Configuration Issue
If you are using Microsoft Entra, this error may occur if you did not select the "Consent on behalf of your organization" option when first signing in. Ensure this option is checked during the initial login process.
