Unsupported Proxies
Note
Using Proxies/reverse proxies with Tactical RMM is not a supported configuration, the information below is provided here for your reference.
Although these aren't officially supported configurations, we generally will help point you in the right direction. Please use the Discord #unsupported channel to discuss issues related to these complex installations.
General Notes on Proxies and Tactical RMM
Port 443
Make sure websockets option is enabled.
All 3 URL's will need to be configured: rmm, api, mesh
For mesh review TLS Offloading.
Cloudflare Proxy and Cloudflare Tunnel
Note
Between August 2023 and March 2024, MeshCentral would not work properly through CloudFlare proxy/tunnels. Symptoms were Clicking on the "Connect" button under "Desktop" results in "Disconnected" approximately 9/10 times.
Something changed on CloudFlare's end. You can still track the GitHub issue about it here.
As of 23/03/2024 CloudFlare made some kind of change that fixed it without any acknowledgement. While it has started working again, there are no guarantees that this will continue to work. Use at your own risk.
First, just complete a TRMM install like normal- you don't need to put the API, RMM, or Mesh domains into Cloudflare however. You must still follow the TXT record to prove that it's your domain.
Once your TRMM install is completed, navigate to CloudFlare Tunnels and create a new Tunnel. Give it any name, Personally, I chose the name TRMM. Now, follow the instructions to install the connector on your distro of choice.
Adding the Entries to Cloudflare
Now, we need to begin adding the domains. For API, for the subdomain enter the subdomain you chose earlier. In my case api.mydomain Leave "Path" empty. For Service, choose HTTPS then in the URL put your server's LOCAL ip and then port 443.
Scroll down and extend Additional Application Settings. From here, extend TLS and set Origin Server Name to the subdomain + domain that you're using.
Repeat this step for RMM.
Mesh is slightly different. For the subdomain, enter the subdomain you chose earlier. In my case mesh.mydomain, still being sure to leave Path empty. For service, pick Type HTTP, and for URL put your server's LOCAL ip then:4430.
Extend Additional Application Settings and then HTTP settings and set the HTTP Host Header to the subdomain + domain that you're using.
api.{domain}
https | TRMM server IP | 443
Advanced: Origin Server Name | api.{domain}

mesh.{domain}
http | TRMM server IP | 4430
Advanced: HTTP Host Header | mesh.{domain}

rmm.{domain}
https | TRMM server IP | 443
Advanced: Origin Server Name | rmm.{domain}
Now, Mesh will check the external cert when it boots up in order to verify the domain. This will fail as TRMM on setup adds a 127.0.1.1 entry to the /etc/hosts file.
To fix this, SSH into your TRMM server and run the following command:
nano /etc/hosts
On the second line of your hosts file, you should see all the entries listed.
127.0.1.1 trmm.yourdomain trmm api.yourdomain rmm.yourdomain mesh.yourdomain
You need to remove the mesh.yourdomain entry at the end. Once you've done this, you're ready to go. All sites should be accessible and you should be able to add agents and connect/work with them.
Caddy 2
This section will cover using Caddy as a reverse proxy in front of TacticalRMM. The below example uses AWS Route53, ports 4443/8080, and assumes you are using Docker.
In your Caddyfile, create a wild card route with 3 handlers as shown below.
# Caddyfile

{
    email fake@amidaware.com

    acme_dns route53

} # Global options

*.amidaware.com {
        tls {
           dns route53 {
             max_retries 10
             access_key_id "AKIAxxxxxxx"
             secret_access_key "4CXXXXXXXXXXXXXXXXX"
             region "us-east-1"
           }
        } # tls

        @rmm host rmm.amidaware.com
        handle @rmm {
                reverse_proxy rmm.amidaware.com:4443 {
                        transport http {
                                tls_insecure_skip_verify
                        }
                }

        } # rmm

        @api host api.amidaware.com
        handle @api {
                reverse_proxy api.amidaware.com:4443 {
                        transport http {
                                tls_insecure_skip_verify
                        }
                }

        } # api

        @mesh host mesh.amidaware.com
        handle @mesh {
                reverse_proxy https://mesh.amidaware.com:4443 {
                     transport http {
                        tls_insecure_skip_verify
                     }
                }
        } # mesh

} # *.amidaware.com
In your TacticalRMM .env file, change TRMM_HTTP_PORT and TRMM_HTTPS_PORT so that it matches the port you selected in your Caddyfile. In this example it's 4443 and 8080. Also change the MESH_PERSISTENT_CONFIG to 1 so t>
TRMM_HTTP_PORT=8080
TRMM_HTTPS_PORT=4443
Update your mesh config certUrl option with your domain Url as shown below.
  "domains": {
    "": {
      ....
      "certUrl": "https://rmm.amidaware.com",
      "agentConfig": [ "webSocketMaskOverride=0" ]
    }
  },
Restart your Caddy containers
docker compose restart
Locate and make a note of your Caddy certificate files. In this example it was created in:
/mydockercontainers/caddy_data/caddy/certificates/acme-v02.api.letsencrypt.org-directory/wildcard_.amidaware.com
We need to update TacticalRMM's .env file with the Caddy certificates. Create a script named renew-cert.sh and change CERT_CRT and CERT_KEY to match the location in the previous step.
# renew-cert.sh

#!/bin/bash

CERT_CRT=/mydockercontainers/caddy/caddy_data/caddy/certificates/acme-v02.api.letsencrypt.org-directory/wildcard_.amidaware.com/wildcard_.amidaware.com.crt
CERT_KEY=/mydockercontainers/caddy/caddy_data/caddy/certificates/acme-v02.api.letsencrypt.org-directory/wildcard_.amidaware.com/wildcard_.amidaware.com.key

echo "CERT_PUB_KEY=$(sudo base64 -w 0 ${CERT_CRT})" >> .env
echo "CERT_PRIV_KEY=$(sudo base64 -w 0 ${CERT_KEY})" >> .env

echo "Restarting TacticalRMM containers please wait ..."

docker compose down
docker compose up -d --remove-orphans

echo "Make sure to remove the old cert lines in .env file."
Run the script manually when needed or add to cron.
chmod +x renew-cert.sh
./renew-cert.sh
That's all folks. Caddy should be reverse proxying all traffic to TacticalRMM correctly.
Caddy Std Install
This is for putting Caddy as a reverse proxy in front of a standard installation of Tactical RMM. It will leave the nginx reverse proxy in place and have double proxies as a result.
Caddy Config
{
  auto_https off
  http_port 80
  https_port 443
}

#snips
(cert) {
   tls /path/to/your/fullchain.cer /path/to/your/domain.key
}
#rmm
rmm.example.com {
import cert
  encode gzip
  reverse_proxy YOUR_RMM_IP:443 {
     transport http {
        tls_insecure_skip_verify
      }
   }
}

#api
api.example.com {
import cert
  encode gzip
  reverse_proxy YOUR_RMM_IP:443 {
     transport http {
        tls_insecure_skip_verify
      }
   }
}

#mesh
mesh.example.com {
import cert
  encode gzip
  reverse_proxy https://mesh.example.com:443 {
     transport http {
        tls_insecure_skip_verify
      }
   }
}
For the meshcentral config:
{
  "settings": {
    ....
    "tlsOffload": "YOUR_CADDY_IP",
    ....
  },
  "domains": {
    "": {
      ....
      "certUrl": "https://YOUR_CADDY_IP:443",
      "agentConfig": [ "webSocketMaskOverride=0" ],
      ....
    }
  }
}
Traefikv2
Offsite Resource: https://gitlab.com/NiceGuyIT/tactical-goodies/-/tree/main/traefik
This section will assume that by default Traefik will reverse proxy everything on port 443.
Here is a basic Traefik config with docker-compose. Note, the file.directory and file.watch are important:
version: "3.7"
services:
  traefik:
    container_name: traefik24
    image: traefik:v2.4
    restart: unless-stopped
    command:
      - --entryPoints.http.address=:80
      - --entryPoints.https.address=:443
      - --providers.docker=true
      - --providers.docker.endpoint=unix:///var/run/docker.sock
      - --providers.docker.defaultrule=HostHeader(`{{ index .Labels "com.docker.compose.service" }}.$DOMAINNAME`)
      ## This is important, to load the config for RMM and Mesh
      - --providers.file.directory=rules # Load dynamic configuration from one or more .toml or .yml files in a directory.
      - --providers.file.watch=true # Only works on top level files in the rules folder
      ####
      - --certificatesresolvers.dns-cloudflare.acme.dnschallenge=true
      - --certificatesResolvers.dns-cloudflare.acme.email=$CLOUDFLARE_EMAIL
      - --certificatesResolvers.dns-cloudflare.acme.storage=/acme.json
      - --certificatesResolvers.dns-cloudflare.acme.dnsChallenge.provider=cloudflare
      - --certificatesResolvers.dns-cloudflare.acme.dnsChallenge.resolvers=1.1.1.1:53,1.0.0.1:53
    ports:
      - target: 80
        published: 80
        protocol: tcp
        mode: host
      - target: 443
        published: 443
        protocol: tcp
        mode: host
    volumes:
        ##The rules that we will load##
      - $USERDIR/docker/traefik2/rules:/rules
        ##
      - /var/run/docker.sock:/var/run/docker.sock:ro
      - $USERDIR/docker/traefik2/acme/acme.json:/acme.json
      - $USERDIR/docker/traefik2/traefik.log:/traefik.log
    environment:
      - CF_API_EMAIL=$CLOUDFLARE_EMAIL
      - CF_API_KEY=$CLOUDFLARE_API_KEY
    labels:
      - "traefik.enable=true"
      # HTTP-to-HTTPS Redirect
      - "traefik.http.routers.http-catchall.entrypoints=http"
      - "traefik.http.routers.http-catchall.rule=HostRegexp(`{host:.+}`)"
      - "traefik.http.routers.http-catchall.middlewares=redirect-to-https"
      - "traefik.http.middlewares.redirect-to-https.redirectscheme.scheme=https"
      # HTTP Routers
      - "traefik.http.routers.traefik-rtr.entrypoints=https"
      - "traefik.http.routers.traefik-rtr.rule=HostHeader(`traefik.$DOMAINNAME`)"
      - "traefik.http.routers.traefik-rtr.tls=true"
      - "traefik.http.routers.traefik-rtr.tls.domains[0].main=$DOMAINNAME"
      - "traefik.http.routers.traefik-rtr.tls.domains[0].sans=*.$DOMAINNAME"
Before proceeding, we need to change the port 443 to 4443 and 80 to 8080 because the port 443 and 80 are already used by Traefik.
Here is a snippet of the only thing you should modify into docker-compose file of the installation:
  # container for tactical reverse proxy
  tactical-nginx:
    container_name: trmm-nginx
    image: ${IMAGE_REPO}tactical-nginx:${VERSION}
    restart: always
    environment:
      APP_HOST: ${APP_HOST}
      API_HOST: ${API_HOST}
      MESH_HOST: ${MESH_HOST}
      CERT_PUB_KEY: ${CERT_PUB_KEY}
      CERT_PRIV_KEY: ${CERT_PRIV_KEY}
    networks:
      proxy:
        ipv4_address: 172.20.0.20
    ports:
      - "8080:8080" ## port 8080 instead of 80
      - "4443:4443" ## port 4443 instead of 443
Once saved, make sure you run the docker-compose or installation script at least once, so all the directory structures are created. Once you have your certificate (acme.json) generated by traefikv2 we will be able to extract it for rmm.
Copy the acme.json create by traefik into the root of your rmm directory (In my case it's $USERDIR/docker/rmm) which you should have already defined. After that we can run this docker to extract the certificates for us:
version: "3.7"
services:
##Copy the acme.json of Traefik2 at volumes: (userdir/docker/rmm in this case)
  traefik-certs-dumper:
    image: ldez/traefik-certs-dumper:v2.7.4
    entrypoint: sh -c '
      apk add jq
      ; while ! [ -e /data/acme.json ]
      || ! [ `jq ".[] | .Certificates | length" /data/acme.json` != 0 ]; do
      sleep 1
      ; done
      && traefik-certs-dumper file --version v2 --watch
      --source /data/acme.json --dest data/certs'
    volumes:
      - $USERDIR/docker/rmm:/data
Once completed, you should have 1 new folder in your rmm directory $USERDIR/docker/rmm/certs in this example. As the installation instruction, we will pass those to the .env:
echo "CERT_PUB_KEY=$(sudo base64 -w 0 $USERDIR/docker/rmm/certs/certs/**yourdomain.com.crt**)" >> .env
echo "CERT_PRIV_KEY=$(sudo base64 -w 0 $USERDIR/docker/rmm/certs/private/**yourdomain.com.key**)" >> .env
Next we can create 3 rules to tell Traefik to correctly route the https and agent. For that we will create 2 rules into Traefik directory as per it's configuration. folder/traefik/rules
create:
nano app-mesh.toml
and inside it we add:
[http.routers]
  [http.routers.mesh-rtr]
      entryPoints = ["https"]
      rule = "Host(`mesh.**yourdomain.com**`)"
      service = "mesh-svc"
##middleware with 2FA
[http.services]
  [http.services.mesh-svc]
    [http.services.mesh-svc.loadBalancer]
      passHostHeader = true
      [[http.services.mesh-svc.loadBalancer.servers]]
        url = "https://**xxx.xxx.xxx.xxx**:4443" # or whatever your external host's IP is
create:
nano app-meshagent.toml
[http.routers]
  [http.routers.mesh-rtr1]
      entryPoints = ["https"]
      rule = """Host(`mesh.**yourdomain.com**`) &&
        PathPrefix( `/agent.ashx`, `/meshrelay.ashx`, ) &&
        Headers(`X-Forwarded-Proto`, `wss`) """
    ##Don't add middle where, the agent wont work.
[http.services]
  [http.services.mesh-svc1]
    [http.services.mesh-svc.loadBalancer]
      passHostHeader = true
      [[http.services.mesh-svc1.loadBalancer.servers]]
        url = "https://**xxx.xxx.xxx.xxx**:4443" # or whatever your external host's IP is
create:
nano app-rmm.toml
and inside it we add:
[http.routers]
  [http.routers.rmm-rtr]
      entryPoints = ["https"]
      rule = "Host(`rmm.**yourdomain.com**`)"
      service = "rmm-svc"

      ##middleware with 2FA

[http.services]
  [http.services.rmm-svc]
    [http.services.rmm-svc.loadBalancer]
      passHostHeader = true
      [[http.services.rmm-svc.loadBalancer.servers]]
        url = "https://xxx.xxx.xxx.xxx:4443" # or whatever your external host's IP:port is
That's it, you can now restart Tactical. rmm and mesh.yourdomain.com should work, same for the agent. Please note that if you have a middleware with 2FA you can still use it with the inside mesh.toml, but do not add it with the agent.
HAProxy
Check / change the MeshCentral config.json, some of the values may be set already. CertUrl must be changed to point to the HAProxy server if not using the same certs for both HAProxy and TRMM.
MeshCentral Adjustment
Credit to @bradhawkins
Edit MeshCentral config:
nano /meshcentral/meshcentral-data/config.json
Insert this (modify HAProxyIP to your network):
{
  "settings": {
    "Port": 4443,
    "AliasPort": 443,
    "RedirPort": 8080,
    "TlsOffload": "127.0.0.1",
  },
  "domains": {
    "": {
      "CertUrl": "https://HAProxyIP:443/",
    }
  }
}
Restart MeshCentral:
systemctl meshcentral restart
NGINX ADJUSTMENTS
You will need to edit the nginx.conf file in the http section on the trmm server to recognize the X-Forwarded-For Header that will be sent from haproxy.
Edit file /etc/nginx/nginx.conf Add the lines from 'real_ip' module inside http tag:
set_real_ip_from    192.168.0.200; #IP Address of your haproxy server
real_ip_header      X-Forwarded-For;
Restart nginx:
systemctl restart nginx.service
HAProxy Config
The order of use_backend is important, and Tactical-Mesh-WebSocket_ipvANY must be before Tactical-Mesh_ipvANY.
This assumes a standard VM install or Docker instance, unaltered.
If you've altered exposed ports on your VM or Docker instance, those will need to be adjusted in the configuration.
The values of timeout connect, timeout server, and timeout tunnel have been configured to maintain a stable agent connection, however you may need to adjust these values to suit your environment:
frontend http-to-https-shared
      bind                  0.0.0.0:80
      mode                  http
      log                     global
    option                socket-stats
      option                  http-server-close
    option                dontlognull
    option            forwardfor
    acl https ssl_fc
    http-request set-header         X-Forwarded-Proto http if !https
    http-request set-header         X-Forwarded-Proto https if https
    http-request add-header         X-Real-IP %[src]
      timeout client        30000
    acl                   rmm       var(txn.txnhost) -m str -i rmm.example.com
      acl                     api       var(txn.txnhost) -m str -i api.example.com
      acl                     mesh    var(txn.txnhost) -m str -i mesh.example.com
    http-request set-var(txn.txnhost) hdr(host)
    http-request redirect scheme https  if  rmm
      http-request redirect scheme https  if  api
      http-request redirect scheme https  if  mesh


frontend https-shared
      bind                  0.0.0.0:443   ssl crt-list /var/etc/haproxy/HTTPS.crt_list  #ADJUST THIS TO YOUR OWN SSL CERTIFICATES
      mode                  http
      log                     global
      option                  socket-stats
      option                  dontlognull
      option                  http-server-close
      option                  forwardfor
      acl https ssl_fc
      http-request set-header       X-Forwarded-Proto http if !https
      http-request set-header       X-Forwarded-Proto https if https
      timeout client        30000
      acl               aclcrt_https_shared     var(txn.txnhost) -m reg -i ^([^\.]*)\.example\.com(:([0-9]){1,5})?$
    acl                   rmm       var(txn.txnhost) -m str -i rmm.example.com
      acl                     nats-websocket      var(txn.txnpath) -m sub -i /natsws
      acl                     api       var(txn.txnhost) -m str -i api.example.com
      acl                     is_websocket    hdr(Upgrade) -i WebSocket
      acl                     mesh    var(txn.txnhost) -m str -i mesh.example.com
      acl                     api-ws      var(txn.txnhost) -m sub -i api.example.com
    http-request set-var(txn.txnhost) hdr(host)
    http-request set-var(txn.txnpath) path
    use_backend rmm.example.com_ipvANY  if  rmm
    use_backend rmm.example.com-websocket_ipvANY  if  nats-websocket api-ws
    use_backend rmm.example.com_ipvANY  if  api
    use_backend mesh.example.com-websocket_ipvANY  if  is_websocket mesh
    use_backend mesh.example.com_ipvANY  if  mesh


backend rmm.example.com_ipvANY
      mode                  http
      log                     global
      timeout connect       30000
      timeout server        30000
      retries                 3
      http-request add-header X-Forwarded-Host %[req.hdr(Host)]
      http-request add-header X-Forwarded-Proto https
      server                  rmm x.x.x.x:443 ssl  verify none

backend rmm.example.com-websocket_ipvANY
      mode                  http
      log                     global
      timeout connect       30000
      timeout server        30000
      retries                 3
      timeout tunnel    3600000
      http-request add-header X-Forwarded-Host %[req.hdr(Host)]
      http-request add-header X-Forwarded-Proto https
      server                  rmm-websocket x.x.x.x:443 ssl  verify none

backend mesh.example.com-websocket_ipvANY
      mode                  http
      log                     global
      timeout connect       3000
      timeout server        3000
      retries                 3
      timeout tunnel    3600000
      http-request add-header X-Forwarded-Host %[req.hdr(Host)]
      http-request add-header X-Forwarded-Proto https
      server                  mesh-websocket x.x.x.x:443 ssl  verify none

backend mesh.example.com_ipvANY
      mode                  http
      log                     global
      timeout connect       15000
      timeout server        15000
      retries                 3
      timeout tunnel    15000
      http-request add-header X-Forwarded-Host %[req.hdr(Host)]
      http-request add-header X-Forwarded-Proto https
      server                  mesh x.x.x.x:443 ssl  verify none
HAProxy How-to for pfSense
https://github.com/ninjamonkey198206/T-RMM-PFSense-HAProxy-config
HAProxy How-to for Baremetal
https://github.com/ninjamonkey198206/T-RMM-Baremetal-HAProxy
HAProxy in TCP Mode, pfSense
In this scenario, you install TRMM as per documentation.
Meaning your certificates are generated and managed on your TRMM server, just use the install.sh and follow docs and on-screen instructions.
HAProxy here will just pass the traffic to the NGINX on TRMM server. No certificate management. Only use this method if you have more than 1 server that need to use port 443 on the same public IP.
Assumptions
These are some assumptions made to make this guide, short, easy to follow and to the point. Of course you can adapt it to your environment and/or current configuration.
- You have a pfSense firewall.
- You have HAProxy installed.
- You don't have any
httpfrontends on your HAProxy. - You have firewall rule to allow traffic from your WAN to HAProxy 443 port.
- You have set Max Connections on Settings to a value MORE than the agents you plan to connect.
- Your subdomains are:
api,mesh,rmm - You can resolve
(rmm|api|mesh).example.comto your local TRMM server when in your local network. - You can resolve
(rmm|api|mesh).example.comto your public IP when you are outside of your local network.
Global Settings
Config file format, for reference:
global
  maxconn     50000
  stats socket /tmp/haproxy.socket level admin  expose-fd listeners
  gid     80
  nbproc      1
  nbthread      1
  hard-stop-after   15m
  chroot        /tmp/haproxy_chroot
  daemon
  tune.ssl.default-dh-param 2048
  server-state-file /tmp/haproxy_server_state
Values you will have to replace with your own
- 10.10.10.100 - Change with your TRMM local IP.
- example.com - Change with your domain.
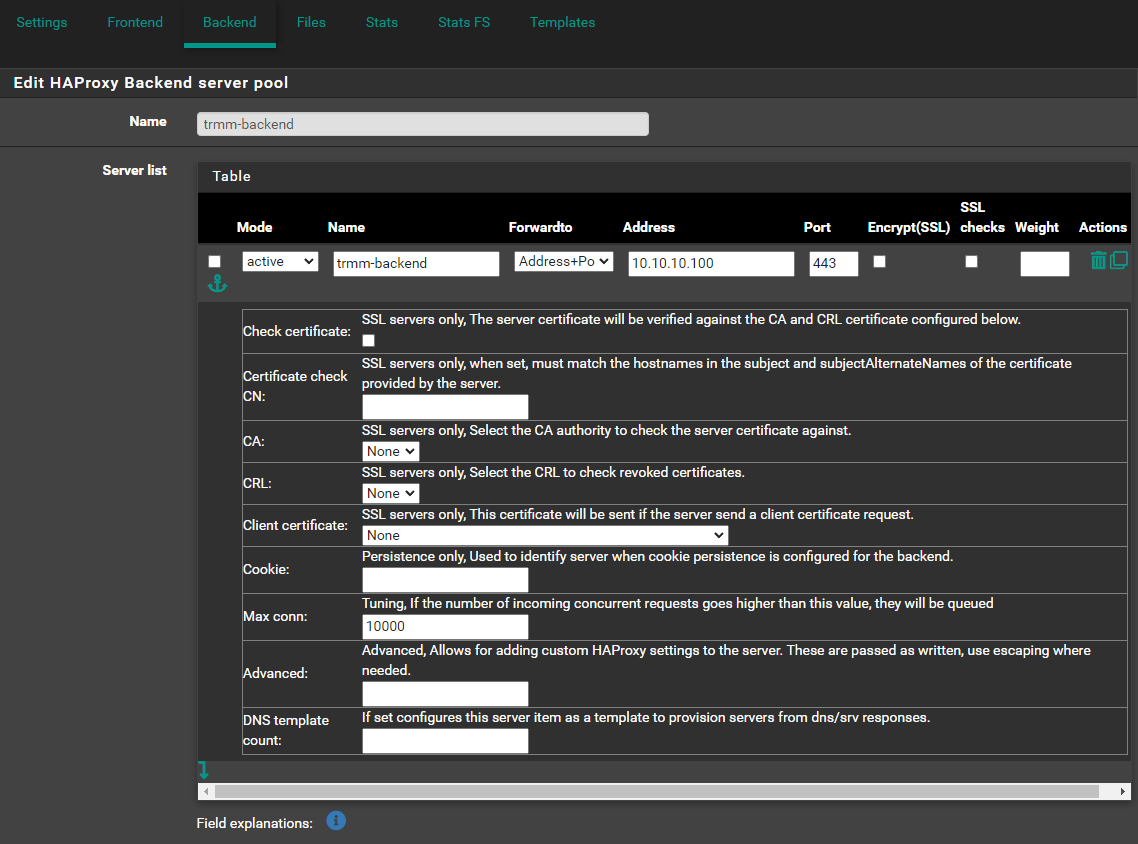
Backend
Navigate to Services -> HAProxy -> Backend
- Click ⤵️Add
Backend server pool
- Name:
trmm-backend - On Server list, Click ⤵️
- Name:
trmm-server - Forwardto:
Address+Port - Address:
10.10.10.100(Reminder: change this) - Port:
443 - Max conn:
10000(Or0for unlimited)
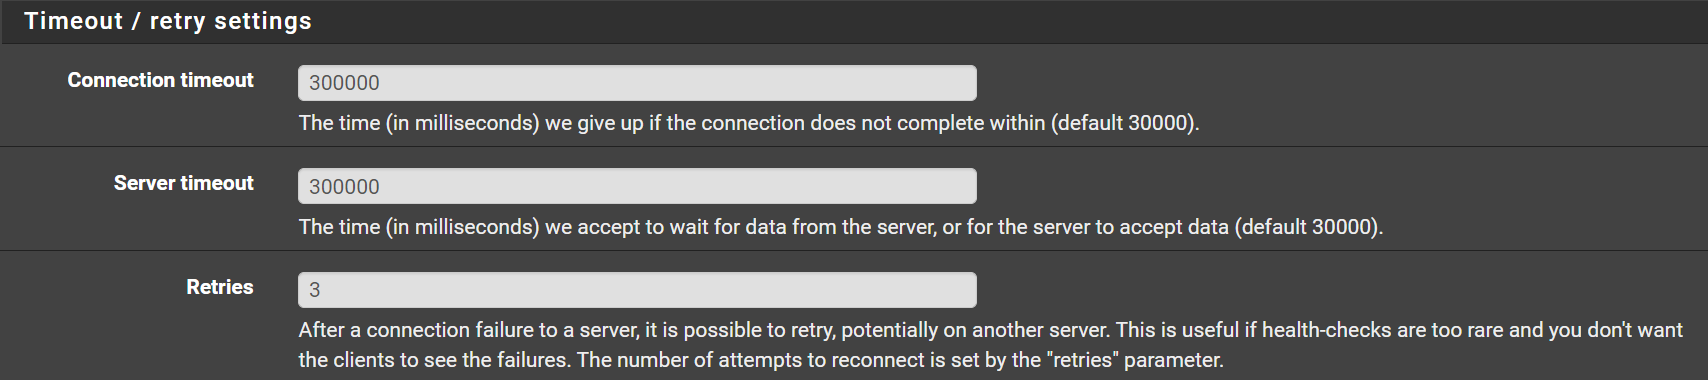
Timeout / retry settings
- Connection timeout:
300000(Note: it has more 0s than the default) - Server timeout:
300000(Note: it has more 0s than the default) - Retries:
3
Health checking
- Health check method:
SSL
Keep this to
nonewhile installing or updating certificates. There might be problems if it's set toSSLorbasicwhile doing so.
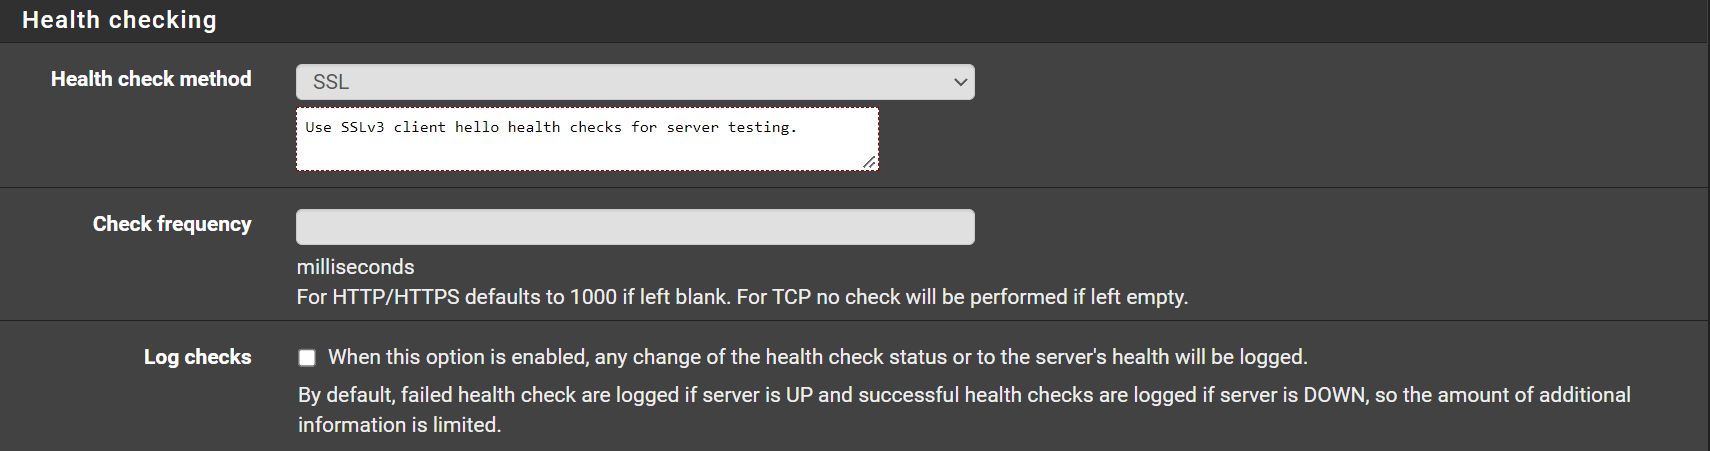
Advanced settings
Please read the warning there, and the note at the bottom. This optional and it's use is to show the real public IP of the agent.
- Check `Use Client-IP to connect to backend servers.
Some remote agents would not let me do RDP without this option. Play with it and see what works for you.
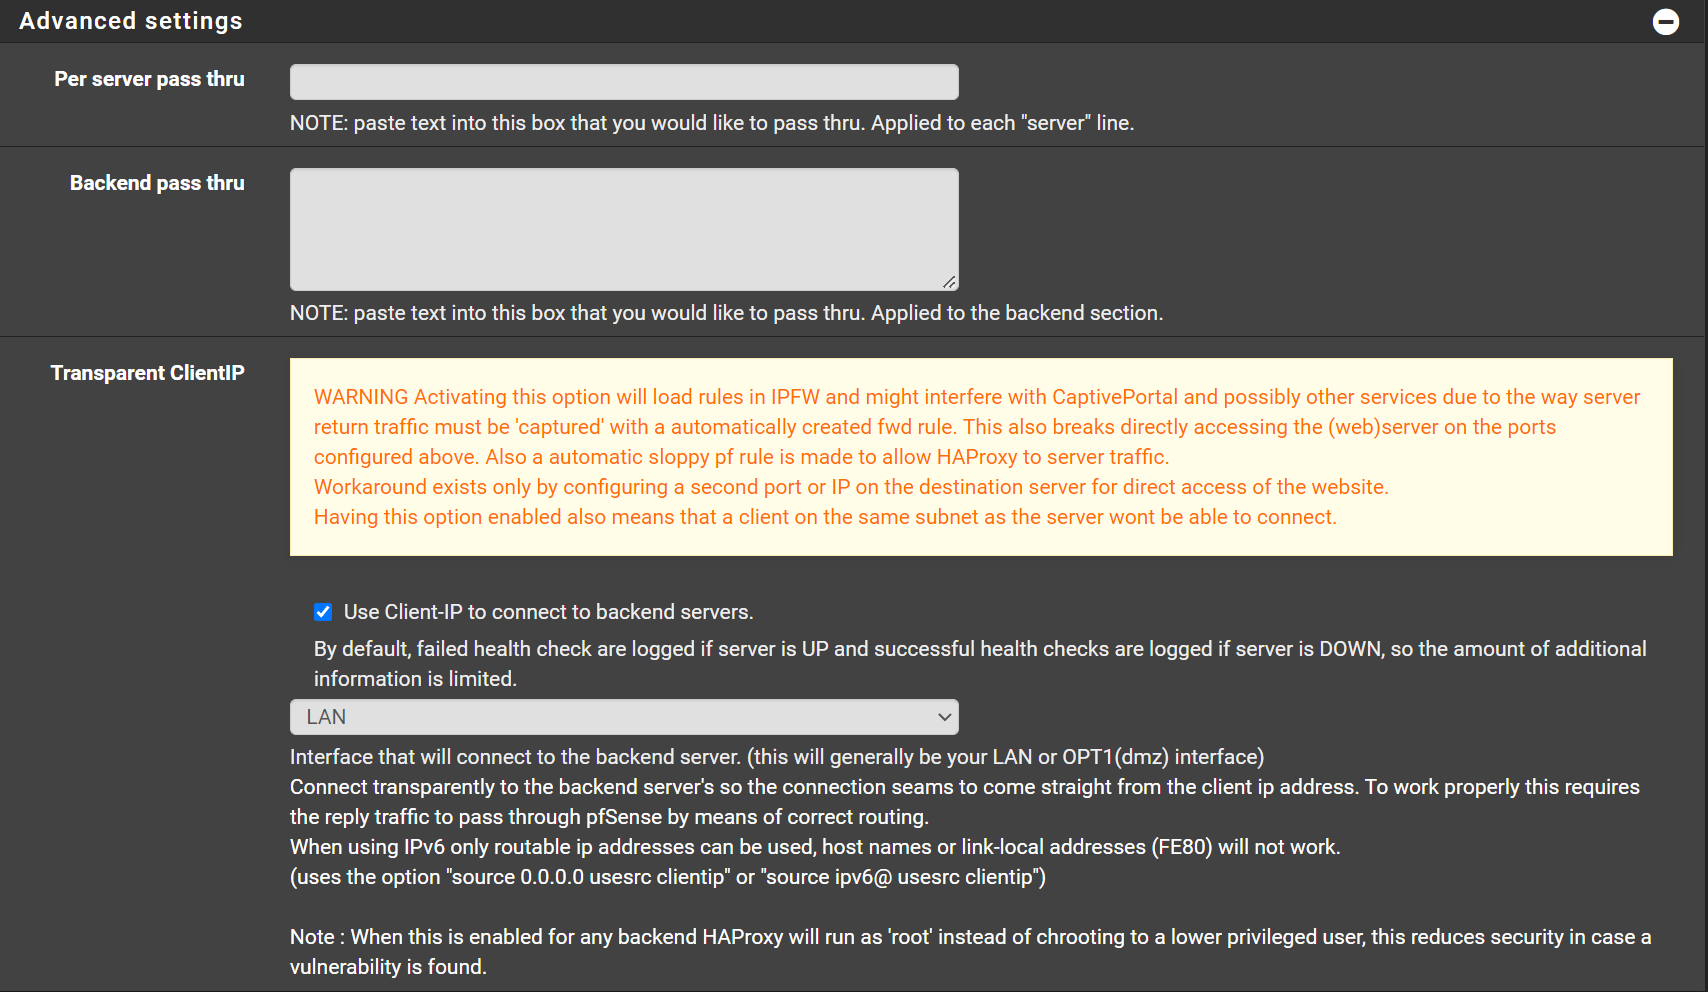
It works well for me, there are cases that it might not work on all environments.
For those who like the config files
backend trmm-backend_ipv4
  mode    tcp
  log     global
  timeout connect   300000
  timeout server    300000
  retries     3
  source ipv4@ usesrc clientip
  option      ssl-hello-chk
  server      trmm-server 10.10.10.100:443 check inter 1000  maxconn 10000
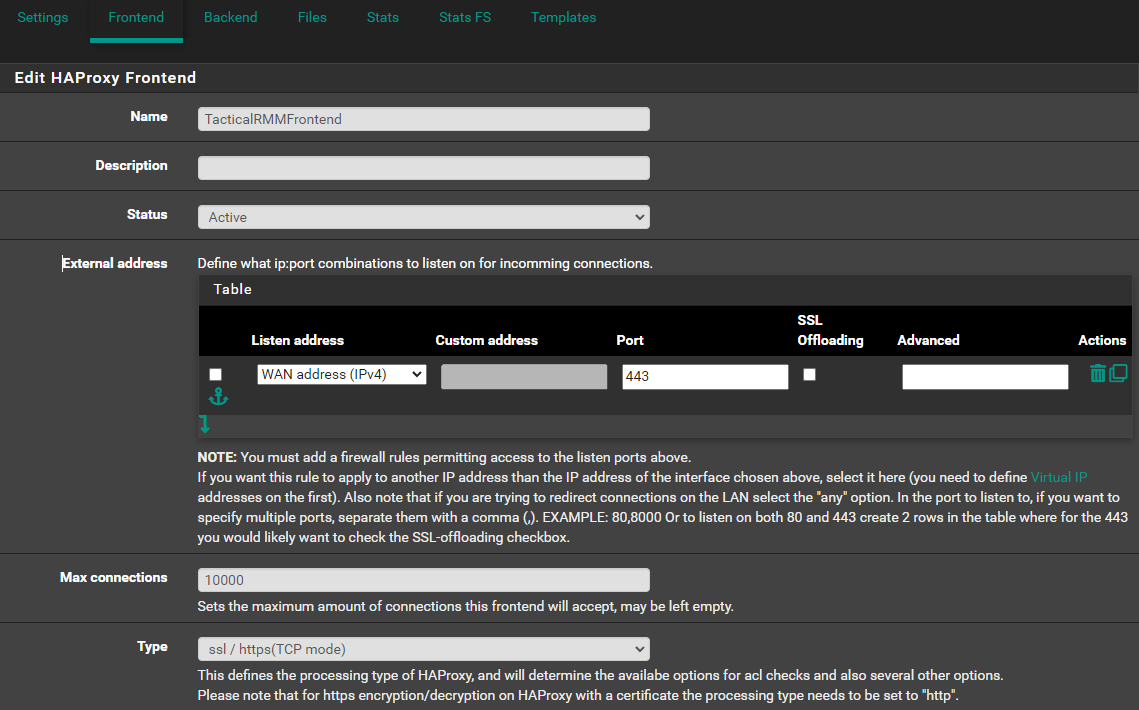
Frontend
Navigate to Services -> HAProxy -> Frontend
- Click ⤵️Add
Edit HAProxy Frontend
- Name:
FrontendTCP - Status:
Active - On External address, click ⤵️
- Listen address:
WAN address (IPv4) - Port:
443 - Max connections:
10000(Or0or unlimited`) - Type:
ssl/https (TCP mode)
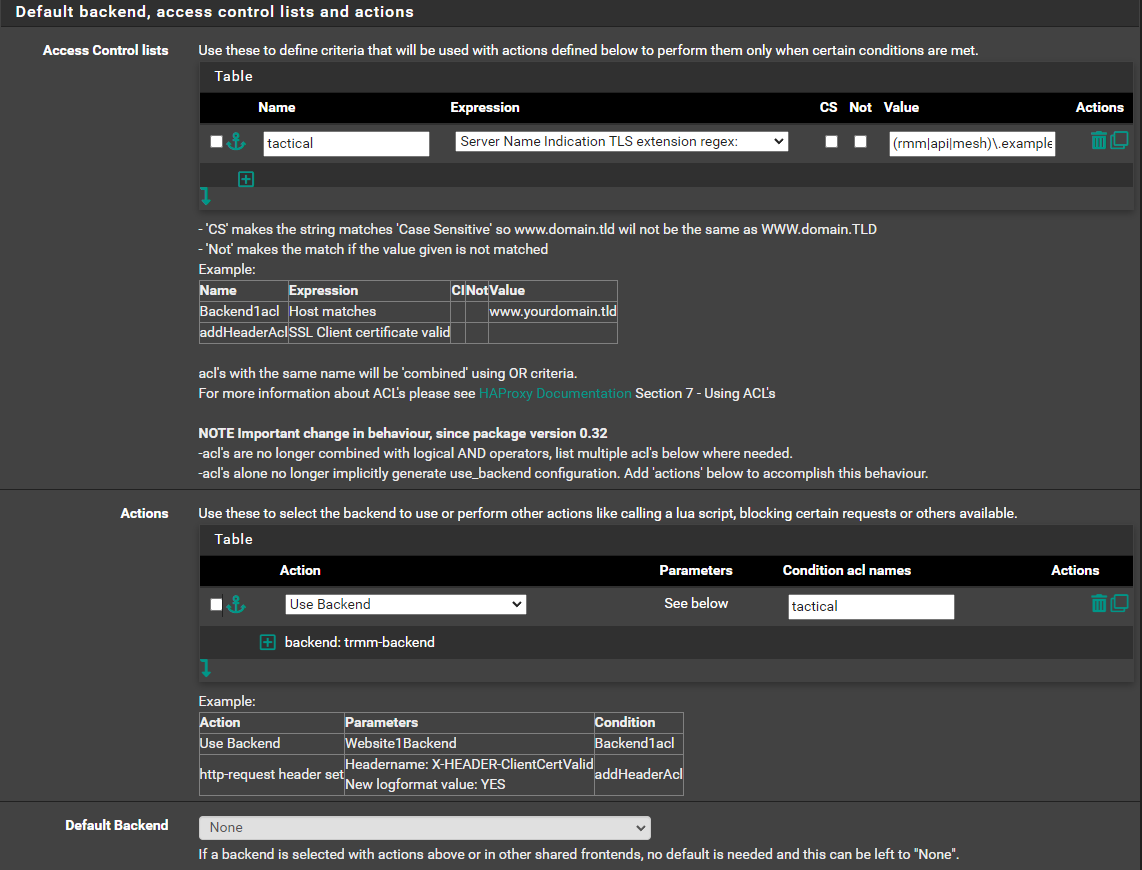
Default backend, access control lists and actions
- On Access Control lists, Click ⤵️
- Name:
tactical - Expression
Server Name Indication TLS extension regex: - value:
(rmm|api|mesh)\.example\.com - On Actions, Click ⤵️
- Action:
Use Backend - Condition acl names:
tactical - backend:
trmm-backend
Advanced settings
- Client timeout:
300000(Note: it has more 0s than the default) - Use "httpclose" option:
http-server-close
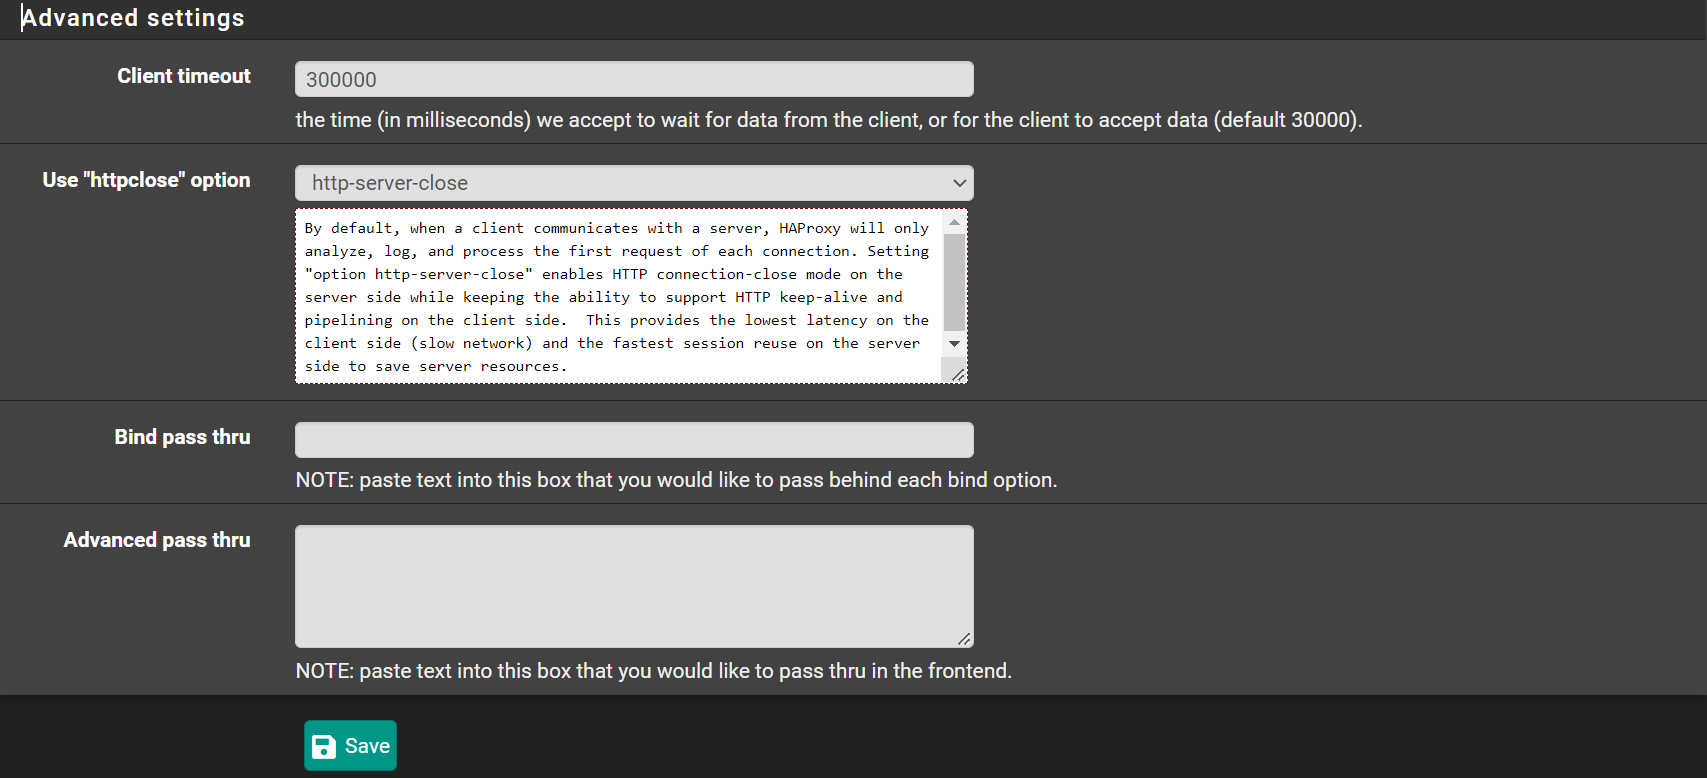
Click 💾Save Click ✔️Apply Changes
For those who like the config files
frontend Frontend-SNI
  bind      YOURWANIP:443 name YOURWANIP:443
  mode      tcp
  log     global
  maxconn     10000
  timeout client    300000
  tcp-request inspect-delay 5s
  acl     tactical  req.ssl_sni -m reg -i (rmm|mesh|api)\.yourdomain\.com
  tcp-request content accept if { req.ssl_hello_type 1 }
  use_backend tactical_ipv4  if  trmm-backend
HAProxy in TCP Mode, OPNsense
In this scenario, you install TRMM as per documentation.
Meaning your certificates are generated and managed on your TRMM server, just use the install.sh and follow docs and on-screen instructions.
HAProxy here will just pass the traffic to the NGINX on TRMM server. No certificate management. Only use this method if you have more than 1 server that need to use port 443 on the same public IP.
Assumptions
These are some assumptions made to make this guide, short, easy to follow and to the point. Of course you can adapt it to your environment and/or current configuration.
- You have a OPNsense firewall.
- You have HAProxy installed.
- You don't have any
httpfrontends on your HAProxy. - You have port forward to forward traffic from your WAN 443 port to OPNsense 443 port.
- You have firewall rule to allow traffic from your WAN to HAProxy 443 port.
- Your subdomains are:
api,mesh,rmm - You can resolve
(rmm|api|mesh).example.comto your local TRMM server when in your local network. - You can resolve
(rmm|api|mesh).example.comto your public IP when you are outside of your local network.
If you notice agents are continue to timeout after 60second (default ping time of MeshAgent). Check
Settings>HAProxy>Config Export. Some backend or frontend still has a lower than60stimeout. Increase it for example to120s.
Settings
Navigate to Services -> HAProxy -> Settings
Service
- Click 🔽 next to
Settingstab. - Click
Service - Check
Enable HAProxy
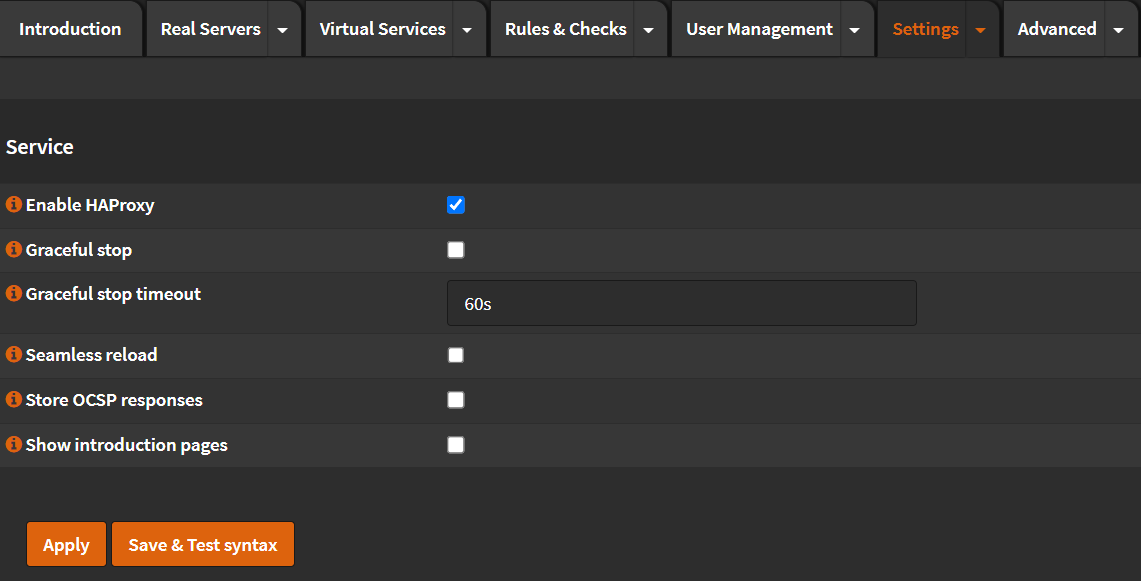
- Click
Apply - Check that HAProxy started (You should see a green ▶️ on the top right corner)
Global Parameters
- Click 🔽 next to
Settingstab. - Click
Global Parameters - Maximum connections: Set this to a number of at least 3 times your agents.
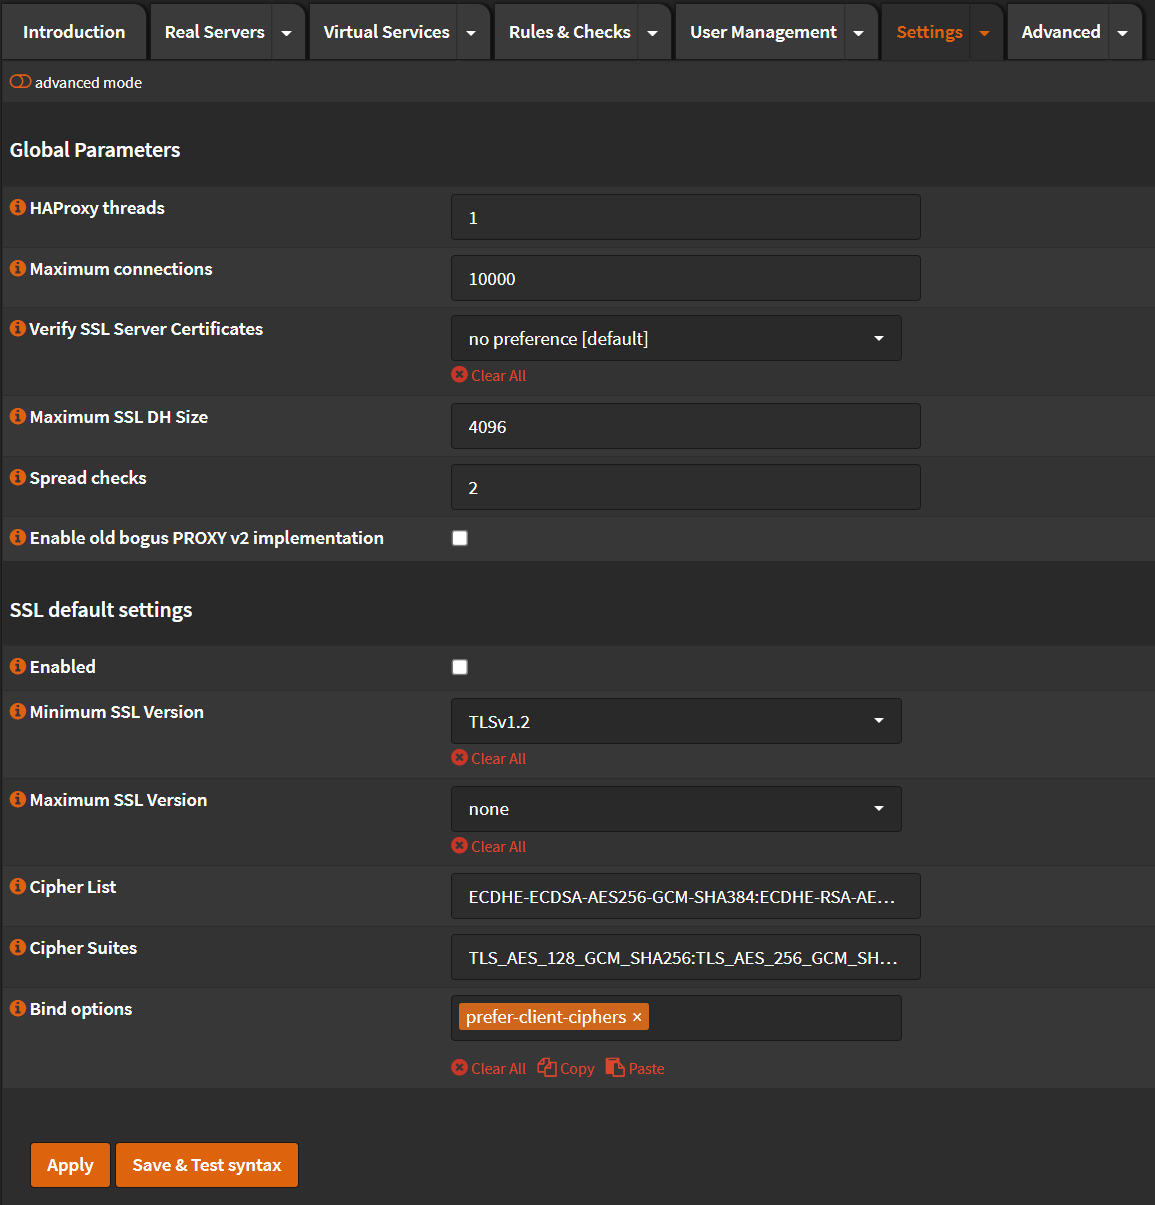
- Click
Apply
Default Parameters
- Click 🔽 next to
Settingstab. - Click
Default Parameters - Maximum connections (Public Services): Set this to a number of at least 3 times your agents.
- Maximum connections (Servers): Set this to a number of at least 3 times your agents.
- Client Timeout:
120s - Connection Timeout:
120s - Retries:
3
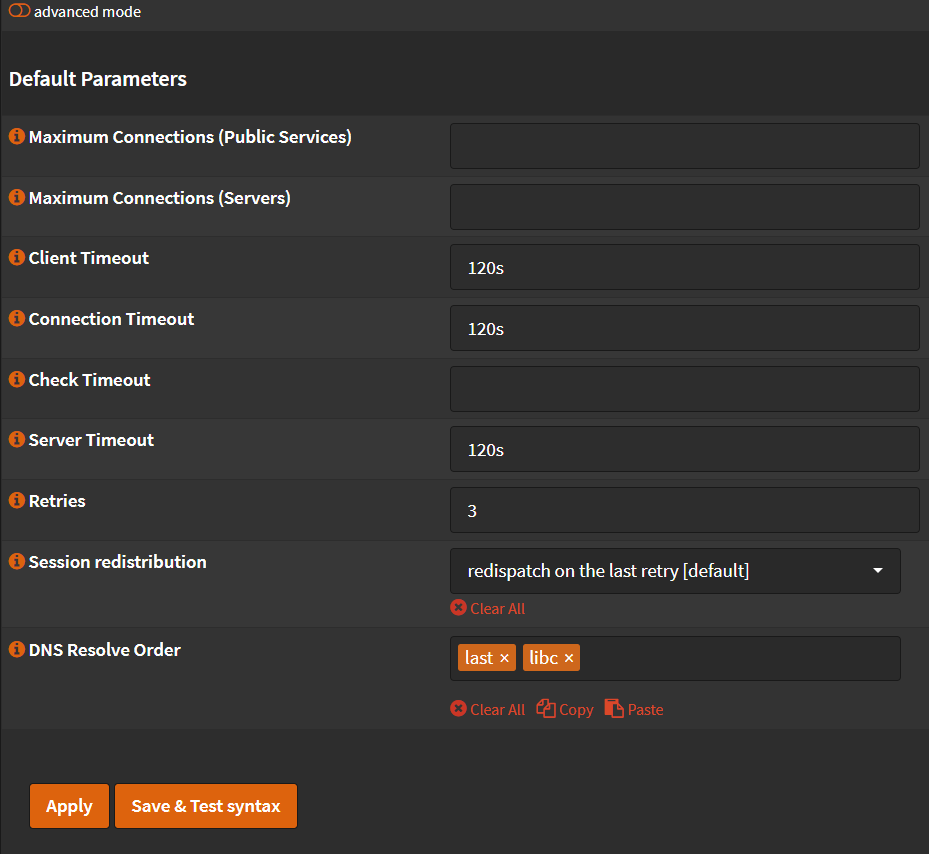
- Click
Apply
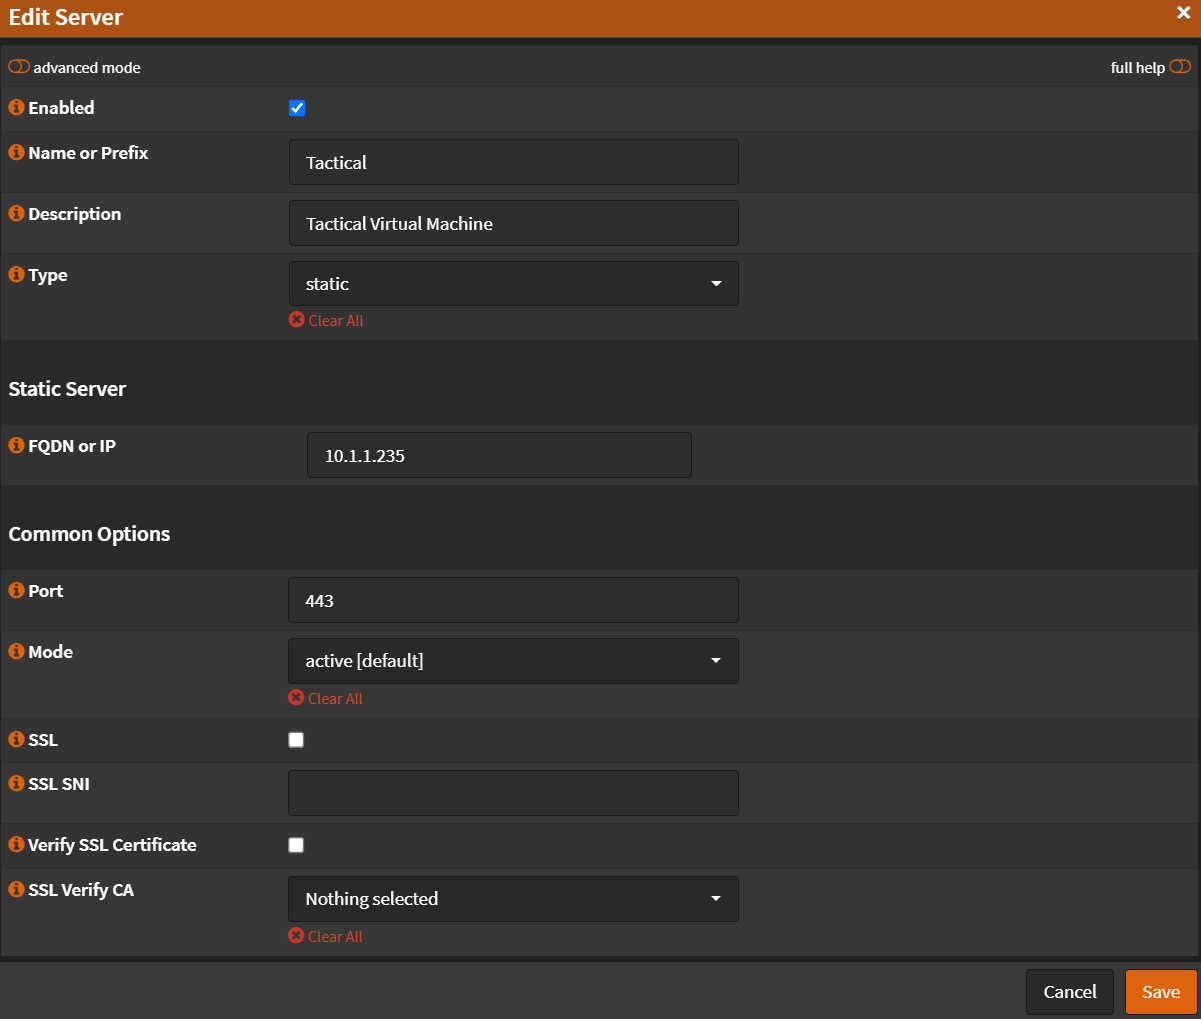
Real Servers
Navigate to Services -> HAProxy -> Settings
- Click 🔽 next to
Real Serverstab. - Click
Real Servers - Click ➕
- Name:
Tactical - Type:
static - FQDN or IP: (Your Tactical RMM VM IP or FQDN)
- Port:
443 - Mode:
active - SSL:
Unchecked - SSL SNI: (Empty)
- Verify SSL Certificate:
Unchecked - Click
Save
- Click
Apply
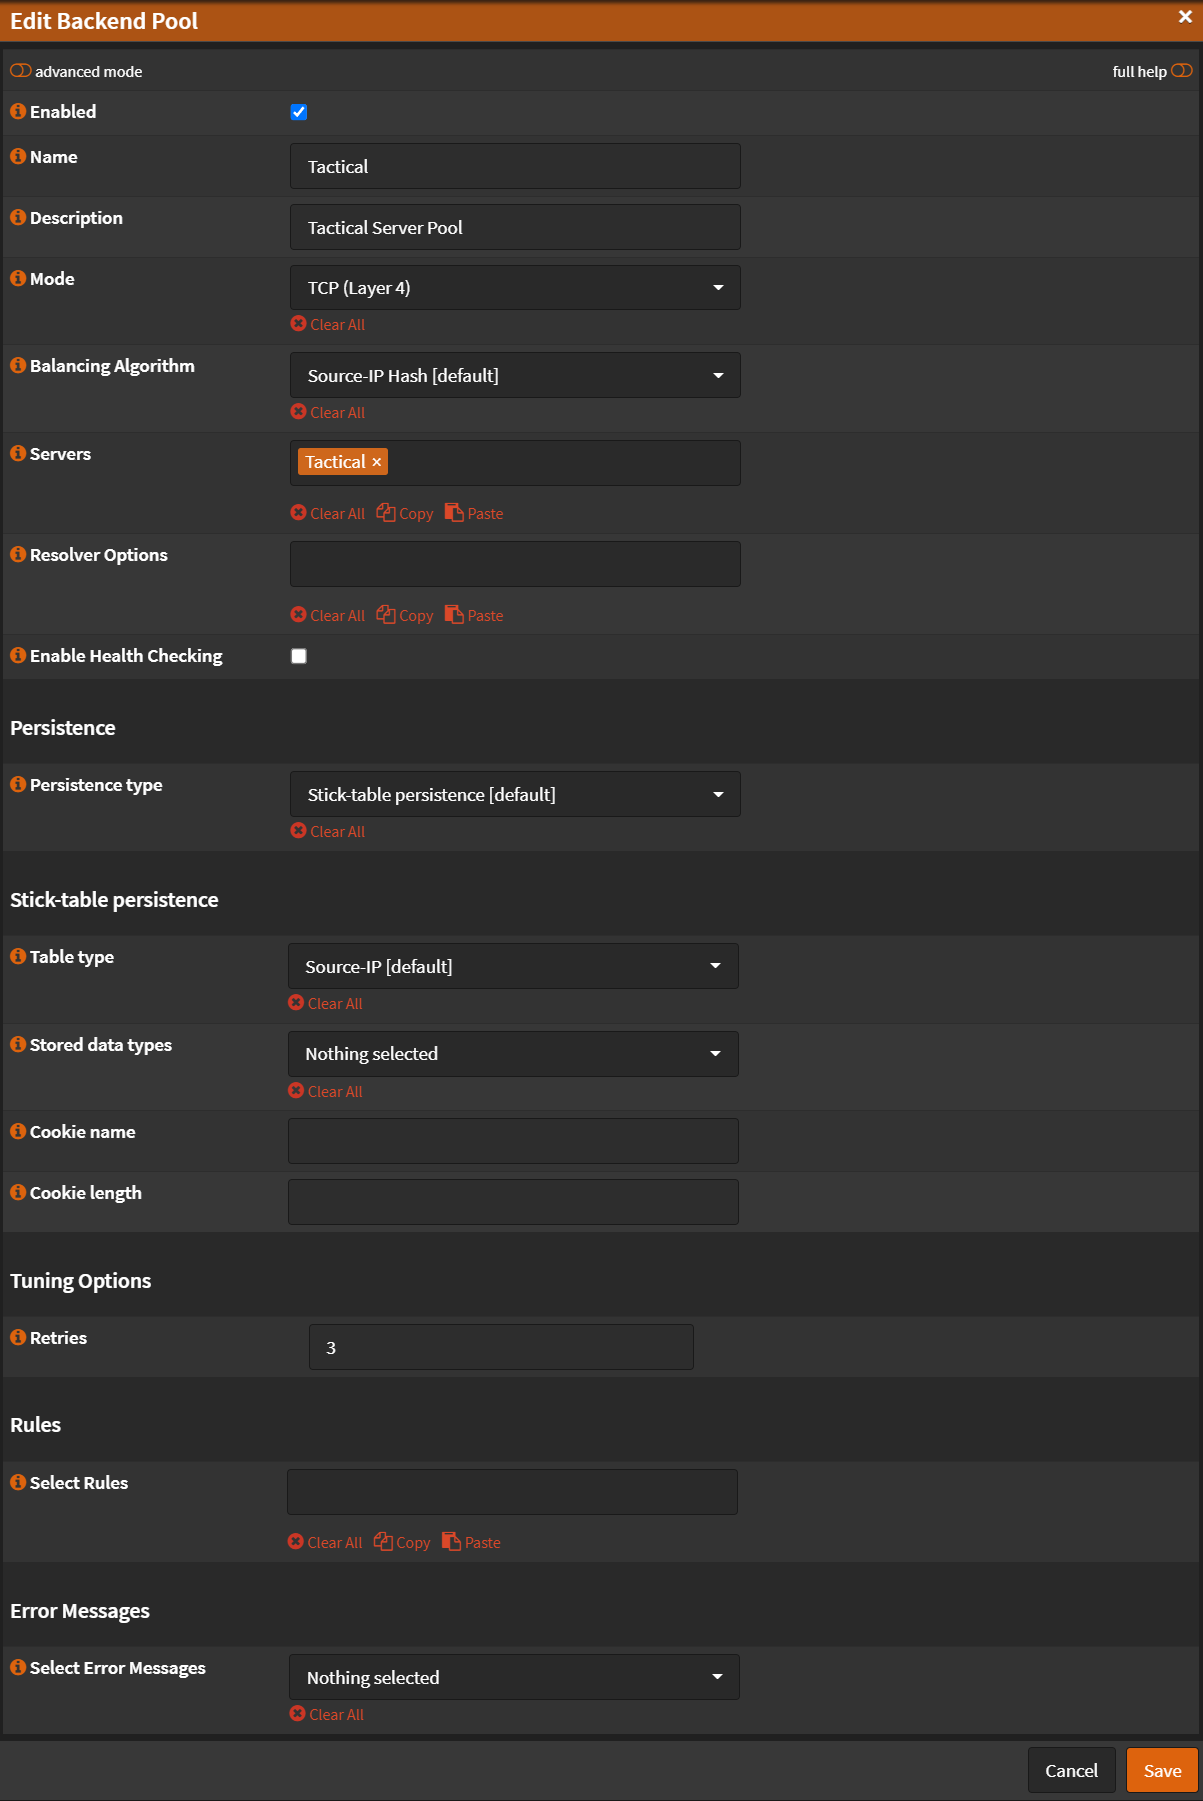
Virtual Services - Backend Pools
Navigate to Services -> HAProxy -> Settings
- Click 🔽 next to
Virtual Servicestab. - Click
Backend Pools - Click ➕
- Name:
Tactical - Description:
Tactical Server Pool - Mode:
TCP (Layer 4) - Health Checking:
Unchecked - Retries:
3 - Click
Save
- Click
Apply
Rules & Checks
Navigate to Services -> HAProxy -> Settings
Conditions
- Click 🔽 next to
Rules & Checkstab. - Click
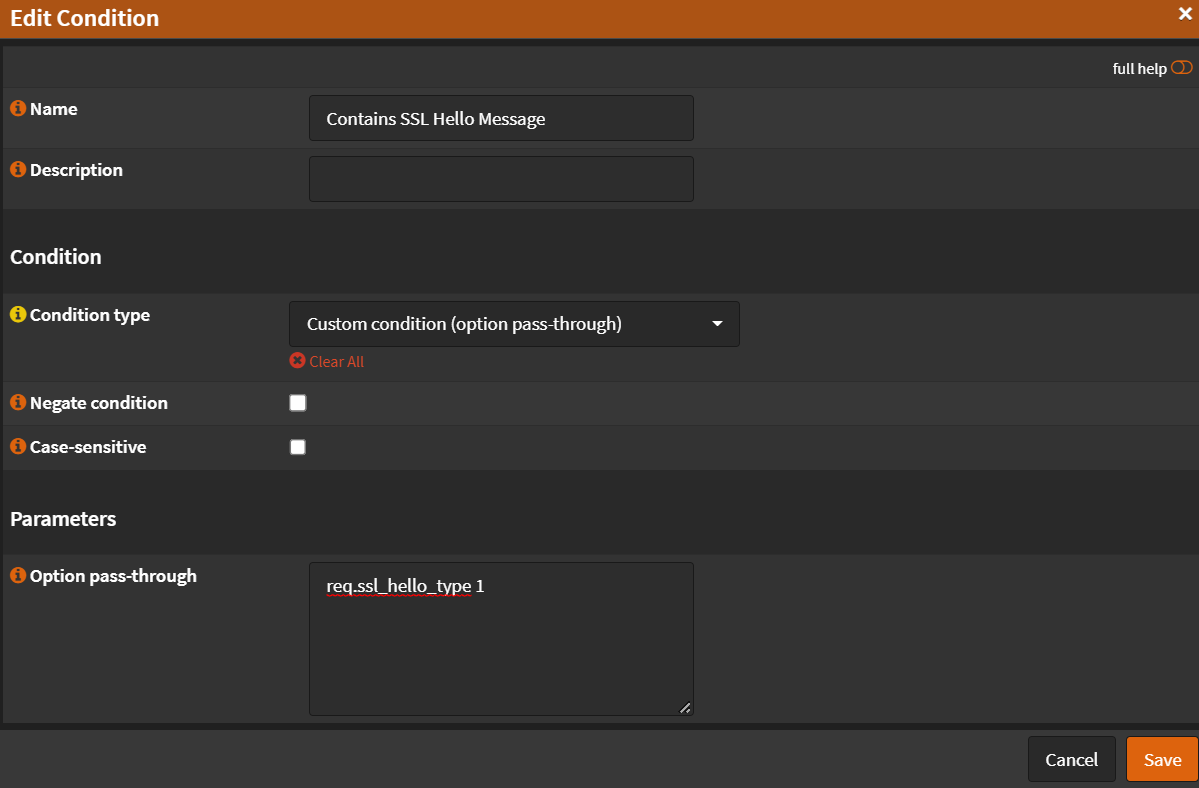
Conditions - Click ➕
- Name:
Contains SSL Hello Message - Condition type:
Custom condition (option pass-through) - Option pass-through:
req.ssl_hello_type 1 - Click
Save
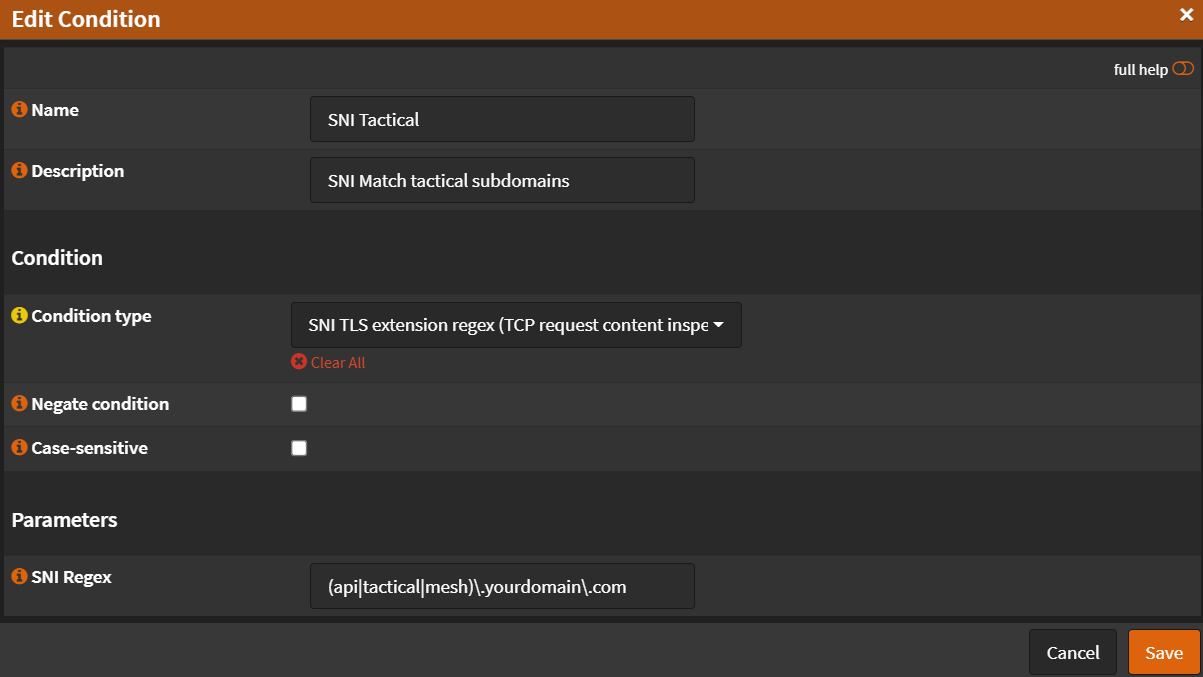
- Click ➕
- Name:
SNI Tactical - Description:
SNI Match tactical subdomains - Condition Type:
SNI TLS extension regex (TCP Request content inspection) - SNI Regex:
(api|tactical|mesh)\.yourdomain\.com - Click
Save
- Click
Apply
Rules
- Click 🔽 next to
Rules & Checkstab. - Click
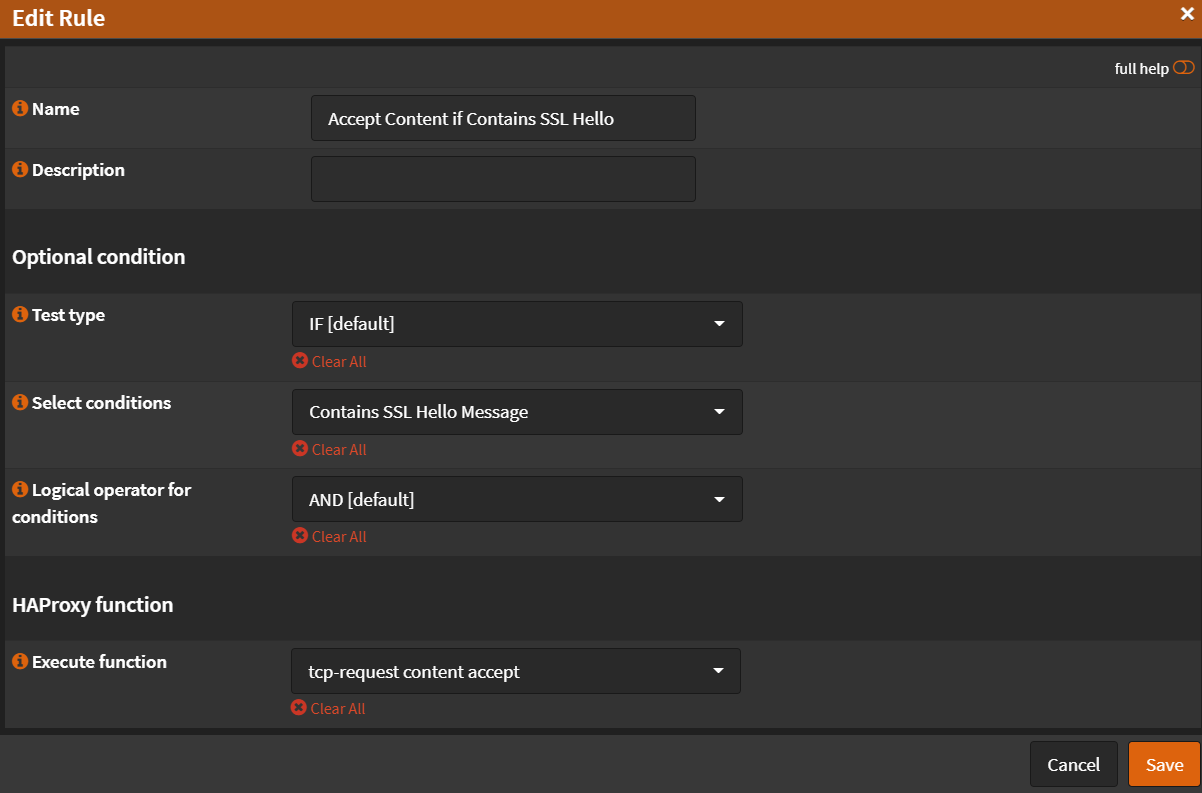
Rules - Click ➕
- Name:
Accept Content if Contains SSL Hello - Select conditions:
Contains SSL Hello Message - Execute function:
tcp-request content accept - Click
Save
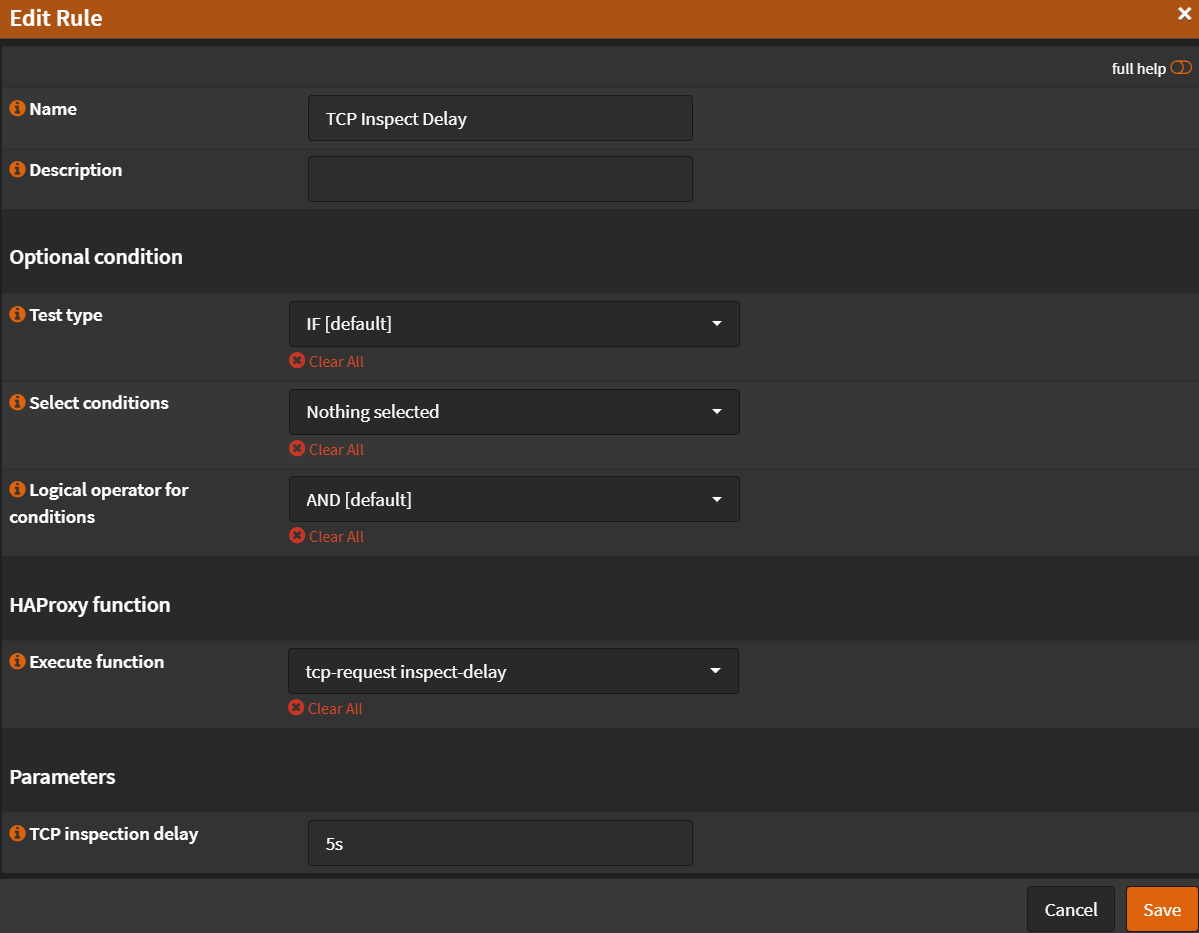
- Click ➕
- Name:
TCP Inspect Delay - Select conditions:
Nothing Selected - Execute function:
tcp-request inspect-delay - TCP inspection delay:
5s - Click
Save
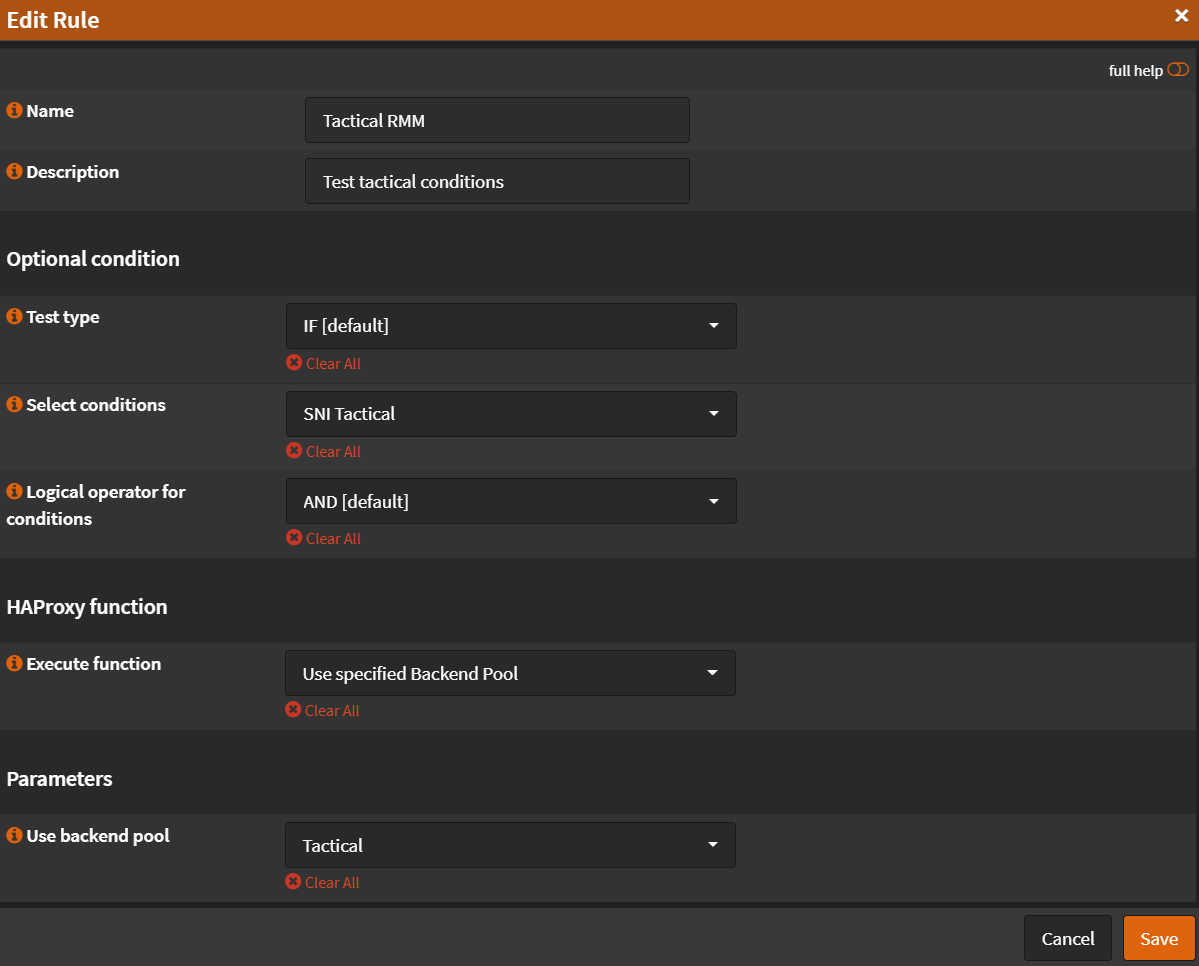
- Click ➕
- Name:
Tactical RMM - Select conditions:
SNI Tactical - Execute function:
Use specified Backend Pool - Use specified Backend Pool:
Tactical - Click
Save
- Click
Apply
Virtual Services - Public Services
Navigate to Services -> HAProxy -> Settings
- Click 🔽 next to
Virtual Servicestab. - Click
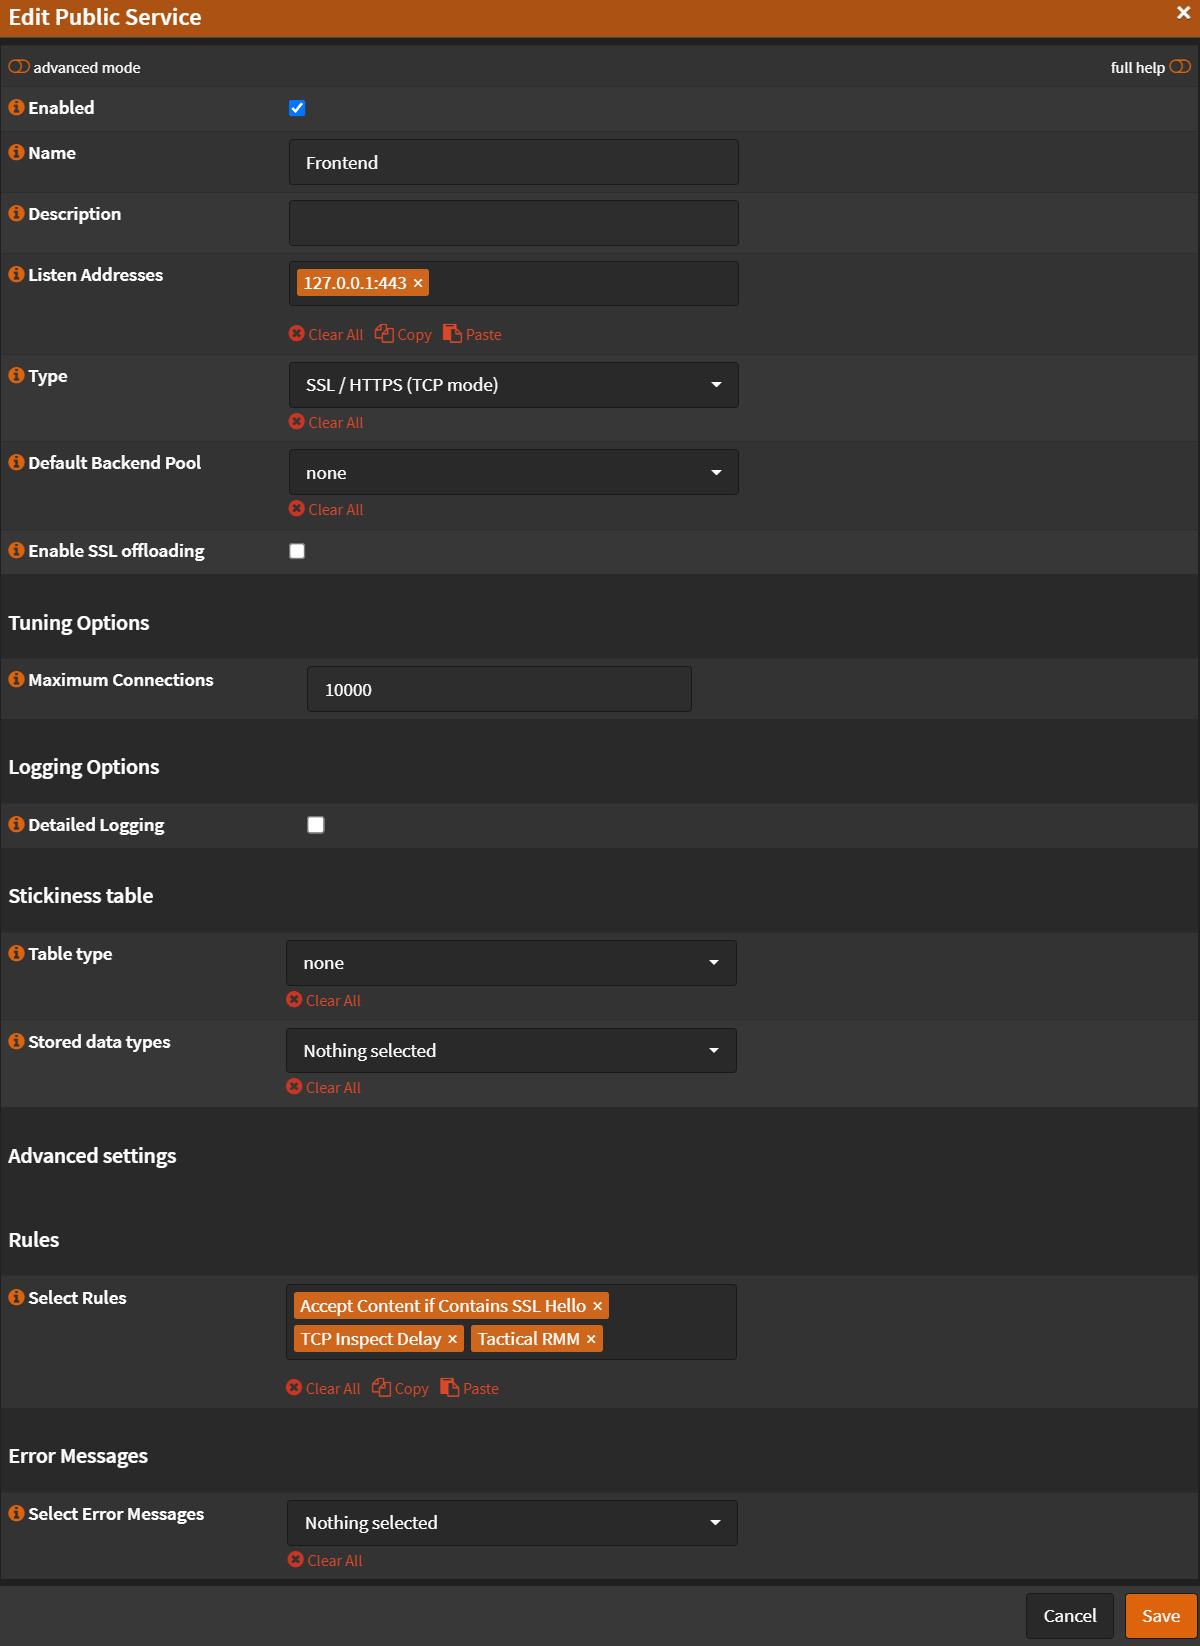
Public Services - Click ➕
- Name:
Frontend - Listen Addresses:
127.0.0.1:443(Remember, you have to have port forward + allow rule) - Type:
SSL / HTTPS (TCP Mode) - Default Backend Pool:
none - SSL Offloading:
Unchecked - Maximum Connections: (Set this to a number of at least 3 times your agents.)
- Select Rules:
Accept Content if Contains SSL HelloTCP Inspect DelayTactical RMM- Click
Save
Note: Order on Rules matter!
- Click
Apply
Apache Proxy
HowTo - Proxy on Apache
TRMM SERVER
Edit file /etc/nginx/sites-enabled/rmm.conf Add the lines from 'real_ip' module inside server tag:
set_real_ip_from    192.168.0.200; #IP Address of your apache proxy
real_ip_header      X-Forwarded-For;
Restart nginx:
systemctl restart nginx.service
APACHE
Enable ssl proxy and rewriteEngine. Set proxy to preserve host. Set upgrade rule to websocket. Set proxypass rules redirecting to rmm location.
Apache ssl config example:
<VirtualHost *:443>

    ServerName rmm.blablabla.com.br:443
    ServerAlias mesh.blablabla.com.br:443 api.blablabla.com.br:443
    SSLEngine on

    SSLCertificateFile "C:/Apache24/conf/ssl-rmm.blablabla.com.br/_.blablabla.com.br-chain.pem"
    SSLCertificateKeyFile "C:/Apache24/conf/ssl-rmm.blablabla.com.br/_.blablabla.com.br-key.pem"

    SSLProxyEngine on

    RewriteEngine On
    ProxyPreserveHost On

    # When Upgrade:websocket header is present, redirect to ws
    # Using NC flag (case-insensitive) as some browsers will pass Websocket
    RewriteCond %{HTTP:Upgrade} =websocket [NC]
    RewriteRule ^/(.*)    wss://192.168.0.212/$1 [P,L]

    ProxyPass "/"  "https://192.168.0..212/" retry=3
    ProxyPassReverse "/"  "https://192.168.0.212/" retry=3

    BrowserMatch "MSIE [2-5]" \
            nokeepalive ssl-unclean-shutdown \
            downgrade-1.0 force-response-1.0

</VirtualHost>
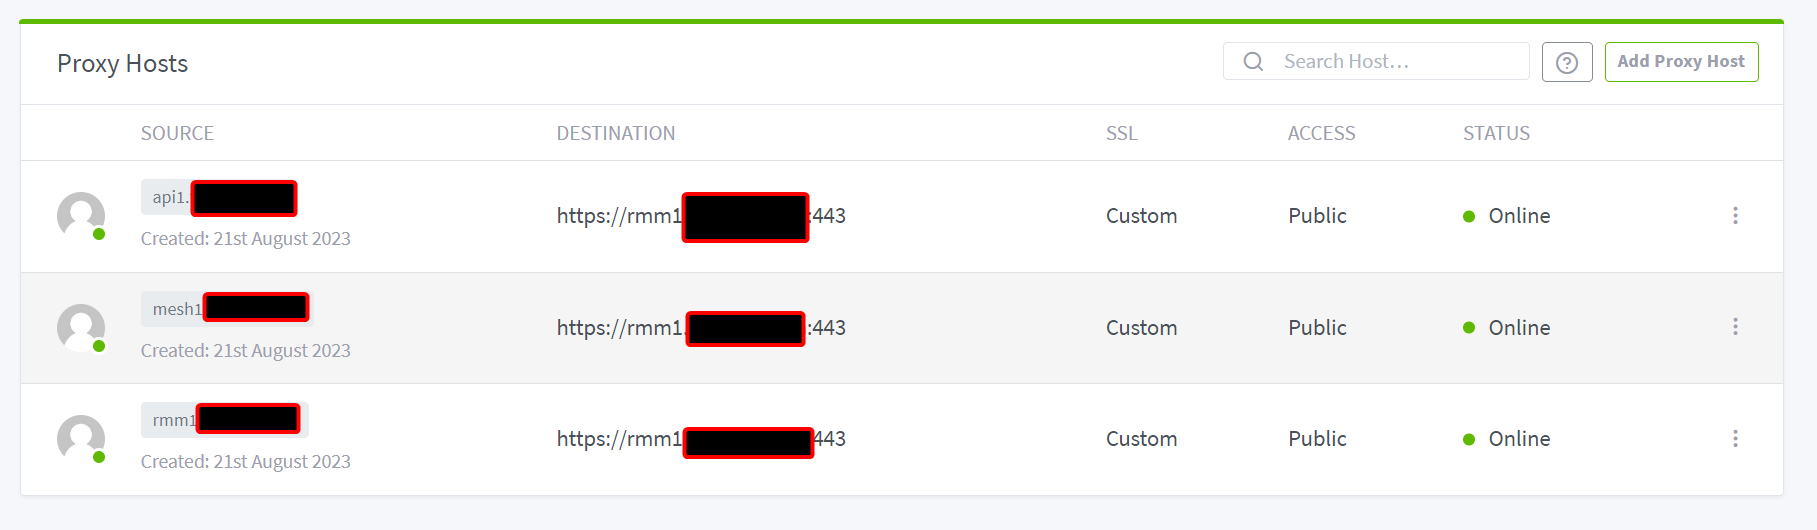
Nginx Proxy Manager (double proxy method)
First, get your TRMM server installed with a standard config and working.
Then in NPM, declare the hosts with the parameters:
api.{domain}
https | TRMM server DNS name | 443
ON: Cache Assets | Block Common Exploits | Websockets Support

mesh.{domain}
https | TRMM server DNS name | 443
ON: Block Common Exploits | Websockets Support
Advanced:
proxy_set_header Host $host;
proxy_set_header CF-Connecting-IP $proxy_add_x_forwarded_for;
proxy_set_header X-Forwarded-Host $host:$server_port;
proxy_set_header X-Forwarded-For $proxy_add_x_forwarded_for;
proxy_set_header X-Forwarded-Proto $scheme;

rmm.{domain}
https | TRMM server DNS name | 443
ON: Cache Assets | Block Common Exploits | Websockets Support
Last thing you have to do, is setup the same certs on NPM and TRMM.
TRMM cert location: /etc/letsencrypt/live/{yourdomain}/
NPM cert location: SSL Certificates tab
Either: Setup SSL certs on NPM (optionally using Cloudflare API). Download and copy certs to TRMM. Then run ./update.sh --force
OR: Run standard TRMM cert renew process using certbot. Then copy the files and upload: Certificate Key (privkey.pem), Certificate (cert.pem), and Intermediate Certificate (chain.pem)
Nginx Proxy Manager Alt Method
Note
Tested and working on the following:
✅ TRMM hosted on Ubuntu 22.04 via Proxmox VM
✅ Nginx Proxy Manager hosted on Debian 11 via Proxmox CT W/ Docker
We'll use "YOURDOMAIN" in place of your actual domain name
Step 1 - Install and test TRMM with no proxy
First and foremost, you need to disable Nginx Proxy Manager. To do this, on your routers firewall settings, forward ports 443 and 80 to the local ip that will be running your TRMM instance. This is only temporary as we want to make sure we can get TRMM installed and running with a STANDARD install FIRST. You will also need to make sure the following subdomains are pointing to your external IP:
api.YOURDOMAIN.com
rmm.YOURDOMAIN.com
mesh.YOURDOMAIN.com
Use curl icanhazip.com to pull your external IP if you don't know it.
Once you have ports 443 and 80 forwarded correctly, go ahead and run a STANDARD install of TRMM on a FRESH machine. You can find the Install Documentation here.
Step 2 - Nginx Proxy Manager Proxy Host Configuration
Assuming you installed TRMM properly and all of its features are working correctly, we will now get into setting up Nginx Proxy Manager to work with TRMM. Go ahead and forward ports 443 and 80 back to your Nginx Proxy Manager instance.
Below you will find the 3 different Proxy Hosts you need to create on Nginx Proxy Manager.
"API" Domain
Details Tab:
Domain Name: --> api.YOURDOMAIN.com
Scheme: --> https
Forward Hostname / IP: --> The Local IP of your TRMM instance. ie: 192.168.1.155
Forward Port: --> 443
Enabled Options:
Cache Assets;
Block Common Exploits;
Websockets Support
Access List: --> Publicly Accessible
"MESH" Domain
Details Tab:
Domain Name: --> mesh.YOURDOMAIN.com
Scheme: --> http
Forward Hostname / IP: --> The Local IP of your TRMM instance. ie: 192.168.1.155
Forward Port: --> 4430
Enabled Options:
Block Common Exploits;
Websockets Support
Access List: --> Publicly Accessible
Advanced Tab:
Custom Nginx Configuration
proxy_set_header Host $host;
proxy_set_header CF-Connecting-IP $proxy_add_x_forwarded_for;
proxy_set_header X-Forwarded-Host $host:$server_port;
proxy_set_header X-Forwarded-For $proxy_add_x_forwarded_for;
proxy_set_header X-Forwarded-Proto $scheme;
"RMM" Domain
Details Tab:
Domain Name: --> rmm.YOURDOMAIN.com
Scheme: --> https
Forward Hostname / IP: --> The Local IP of your TRMM instance. ie: 192.168.1.155
Forward Port: --> 443
Enabled Options:
Cache Assets;
Block Common Exploits;
Websockets Support
Access List: --> Publicly Accessible
NPM SSL Configuration
In order for TRMM to work properly with NPM, you'll need to create a wildcard or multi-domain SSL Certificate.
To do this, on the Nginx Proxy Manager Dashboard, click the SSL Certificates tab.

Now in the top right, click "Add SSL Certificate". Select "Let's Encrypt".

Add each of the domains listed above to the "Domain Names" field. Make sure you add them 1 at a time and click the dropdown of the domain to add it. Once you've added all 3 domains, enable the "I agree" tick and click save.
You should now see something like this in your list of SSL Certs:

Go ahead and download this certificate by clicking the 3 dots to the right of the cert entry and click "Download".
MeshCentral Configuration
Now you should have Nginx Proxy Manager completely setup. Lets move on to the MeshCentral Configuration.
First, cd to /meshcentral/meshcentral-data
Now edit the file named config.json.
Make sure your config file looks like the one shown below.
{
  "settings": {
    "cert": "mesh.YOURDOMAIN.com",
    ....
    "tlsOffload": "Nginx Proxy Manager Local IP",
    "trustedProxy": "Nginx Proxy Manager Local IP",
    ....
  },
  "domains": {
    "": {
      ....
      "certUrl": "https://mesh.YOURDOMAIN.com:443/",
      ....
    }
  }
}
If you want to enable logging in case anything goes wrong during this process, follow the instructions here.
As of now, everything should be working. If you have any issues, feel free to join the discord.
Keep in mind, this is considered an UNSUPPORTED installation. Developers are not obligated to fix any issues you may encounter. Good luck.
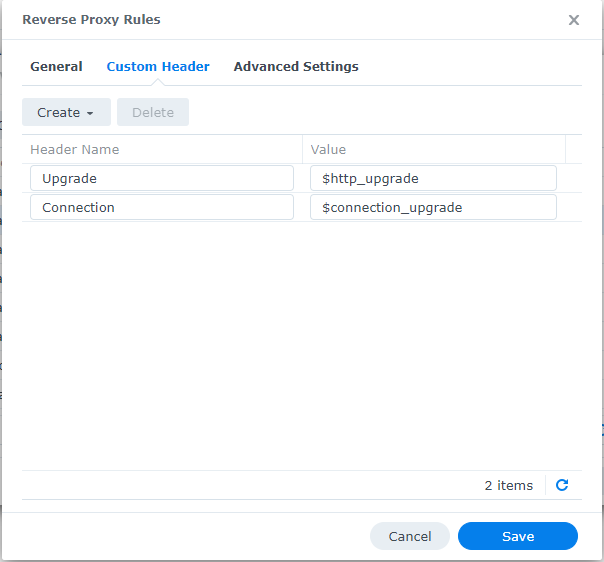
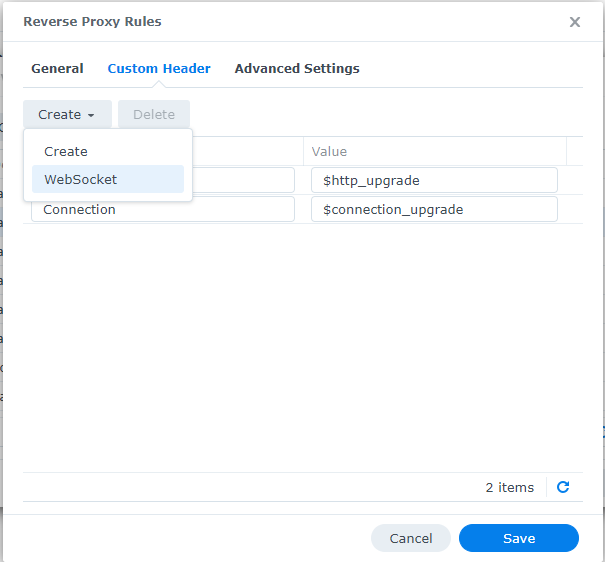
Synology NAS Reverse Proxy Portal
Follow HAProxy
And set the "CertUrl" to point to the IP address of my NAS that was running the reserve proxy and had the certificates installed.
In Synology NAS reverse proxy portal and added websockets to the rmm domains, especially the mesh domain under custom headers, by just clicking the create button and choosing WebSocket: